By Elvira Wang · De-identified · Competency-focused0 / 0 reviewed
About This Reference
This is a clinical study reference compiled by Elvira Wang from her own BOH (Bachelor of Oral Health) clinical placement notes, reorganised by knowledge structure rather than by placement date or appointment. All clinical reasoning, procedural knowledge and teaching content on this page originates from the author's personal coursework and clinical placement experience.
This reference contains no patient-identifying information. Clinical scenarios are presented only as generic teaching vignettes (e.g. "a 9-year-old high-caries-risk patient" rather than any real identity).
How this hub is organised
Content is grouped by knowledge logic rather than by placement or date: Foundations → Diagnosis → Prevention → each clinical procedure → Behaviour/Reasoning.
A dedicated Comparison module places risks, POIG and indications for related procedures side-by-side, since these are frequently assessed together.
A dedicated Competency & Common Errors bank groups recurring clinical-feedback themes by topic rather than by patient.
A Case Simulator turns real placement scenarios into step-by-step clinical-reasoning exercises — read the scenario, work through the differentials/decisions yourself, then reveal the reasoning actually used.
Legend
Critical error — a pattern flagged as a critical error or breach during clinical training.
Competency — a point explicitly tied to competency sign-off criteria.
Pearl — a key clinical reasoning takeaway.
Diagram in original note — a small number of topics reference additional diagrams not reproduced here.
Privacy note: This hub contains no patient-identifying information. Clinical scenarios are kept only as generic teaching vignettes.
How to use this reference: use the search box above to jump to a keyword (e.g. "ICDAS", "SSC", "risks", "POIG"), or browse by module using the sidebar. This is a living document, updated periodically as the author's clinical training progresses.
Study tools built into this page
A reading progress bar at the top of the page tracks scroll position through the current section.
Each subsection has a "Mark as reviewed" checkbox, with progress stored in the browser and summarised as a counter in the header.
The case simulator's scenario bank is expanded on a weekly schedule, with each addition reviewed against OHT scope of practice and the same de-identification standard as the rest of the content.
A dark mode toggle in the header switches the colour theme, and the choice is remembered on return visits.
Personalize mode
Toggling personalize mode (pencil icon in the header) lets a reader add their own subsections to any module, or create entirely new topics in the sidebar, with a rich-text toolbar and support for pasting images and tables. Personal content can be dragged into place in the sidebar, similar to note-taking apps such as Obsidian.
These additions are stored only in the browser's local storage on that device. They are not sent anywhere, do not sync across devices or browsers, and do not modify this reference itself, so clearing browser data or switching devices will not carry them over. An export option is available for saving a backup of personal notes.
Enamel breakdown <0.5mm, discontinuity of enamel, brownish
Hard
4
No breakdown, but visible black/grey dentine shadow underneath
—
5
Dentine breakdown >0.5mm, blackish
Sticky
6
Extensive dentine breakdown, more than half the tooth
—
Active caries vs not: active caries is always sticky to the probe; if smooth → non-carious tooth loss (NCL) or arrested caries. Arrested caries is typically shiny black with a dentine shadow around the fissure; a stain alone has no dentine shadow. Pearl
Watch for interproximal ICDAS code 4 — always probe interproximal surfaces, not just occlusal, or you will miss it. Also don't confuse cupping from erosion, or NCL, with caries. ICDAS 4/5 should always be confirmed against a bitewing rather than relying on the visual/tactile code alone. Workflow order matters too: complete the intraoral odontogram and record ICDAS codes on paper first, then take bitewings and read them, then reconcile — if a tooth charted as ICDAS 5 looks sound on the BW, go back and re-examine it intraorally before finalising the odontogram.
Don't miss: a tooth with deep caries carries a real risk of an existing abscess, sometimes small and easy to overlook — look for a small red area with clear fluid at the surface near the caries, not just an obvious swelling. Pearl
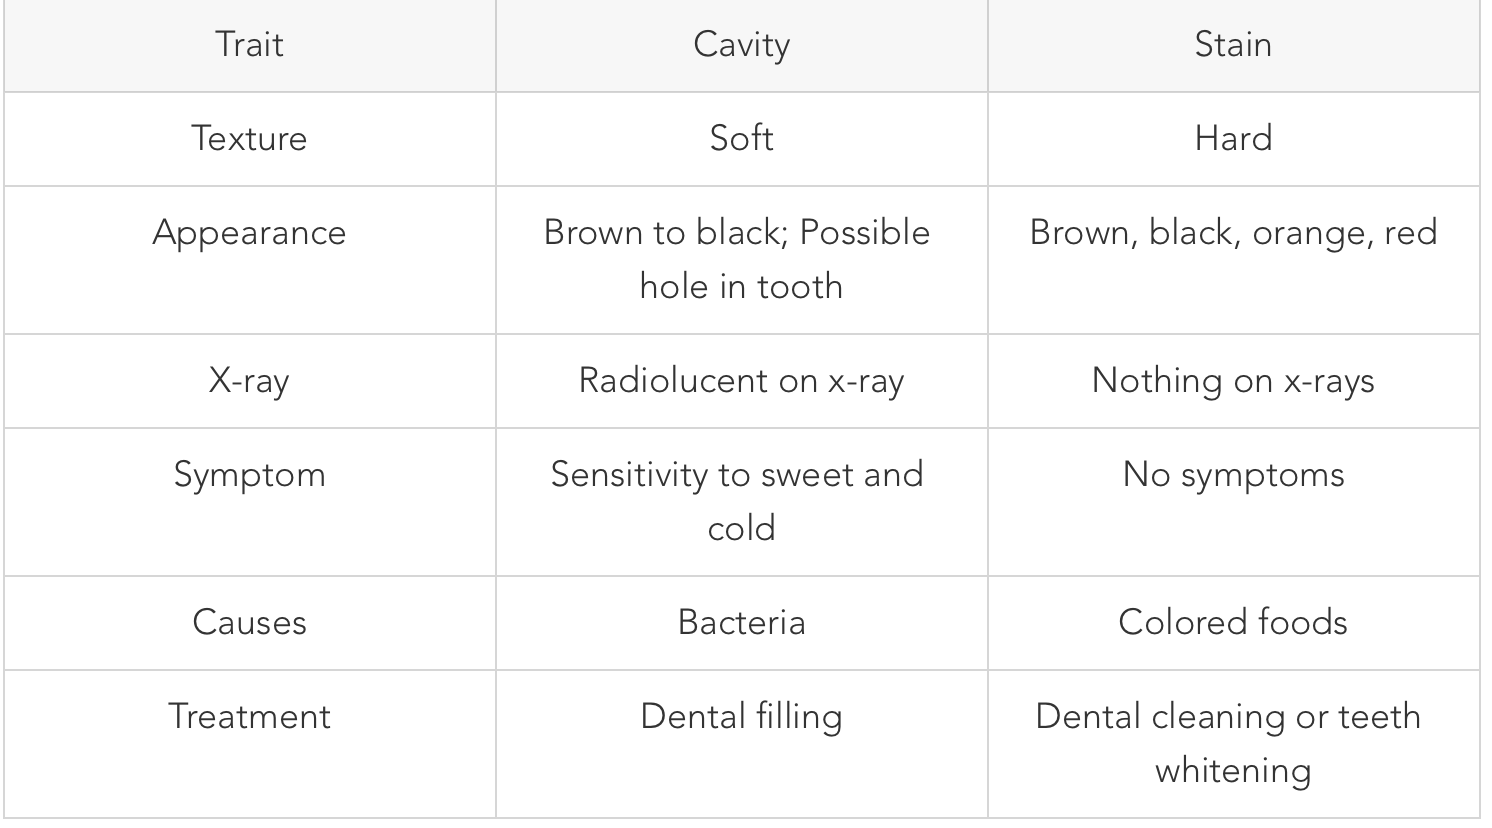
Stain vs cavity at a glance — texture, appearance, radiograph, symptoms, cause and treatment differ on every row; a genuine cavitation (hole) is always a cavity, never a stain.
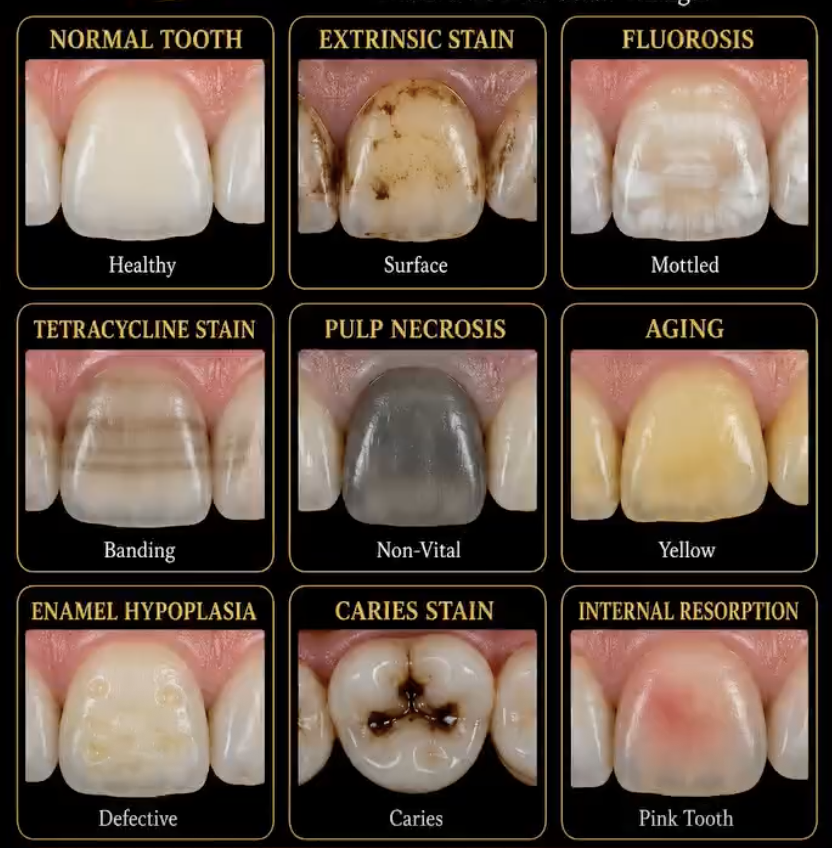
Quick visual differential for tooth discolouration. Ties together several points already covered elsewhere in this hub — e.g. the grey/non-vital appearance of pulp necrosis, and the "pink tooth" sign of internal resorption noted in the Pulp Therapy section.
Once caries or a deep restoration has been identified above, the next diagnostic question is: is any pain coming from the pulp, or from the periodontal ligament (PDL)? And if it's pulpal, is the pulp reversibly inflamed, irreversibly inflamed, or necrotic?
Stops once pressure is removed (unless severe inflammation)
Localisation
Poorly localised — patient may struggle to identify the tooth
Well localised — patient can usually point to the tooth
Percussion
Usually negative unless inflammation has spread beyond the apex
Positive, often markedly tender
Bite test
Usually negative
Positive — pain on biting or release depending on cause
Thermal test
Abnormal response (exaggerated, lingering, or absent if necrotic)
Usually normal if pulp is still vital
Radiograph
Often normal early; deep caries/restoration may be visible
Widened PDL space, loss of lamina dura, or periapical radiolucency may be present
Quick recall: Nervy/pulpal pain = temperature hurts, hard to locate, can wake the patient at night, often spontaneous — "cold and hot." PDL pain = biting hurts, easy to point to, tooth feels "high," tender to percussion — "pressure and percussion."
Usually negative initially; may become positive if apical inflammation develops
Often positive if symptomatic apical periodontitis is present
Radiograph
Usually normal
Deep caries/restoration; often no periapical changes yet
May show widened PDL or periapical radiolucency
Treatment
Remove cause, restore tooth
Root canal treatment or extraction (refer if outside scope)
Root canal treatment or extraction (refer if outside scope)
Easy viva memory: Reversible = responds briefly to cold. Irreversible = lingering cold pain ± spontaneous/night pain. Necrotic = no response to pulp tests; if it still hurts, it's usually the PDL/periapical tissues, not the pulp. Pearl
Irreversible pulpitis + symptomatic apical periodontitis — most common
No response
Positive
Pulp necrosis + symptomatic apical periodontitis
Primary vs permanent tooth ID
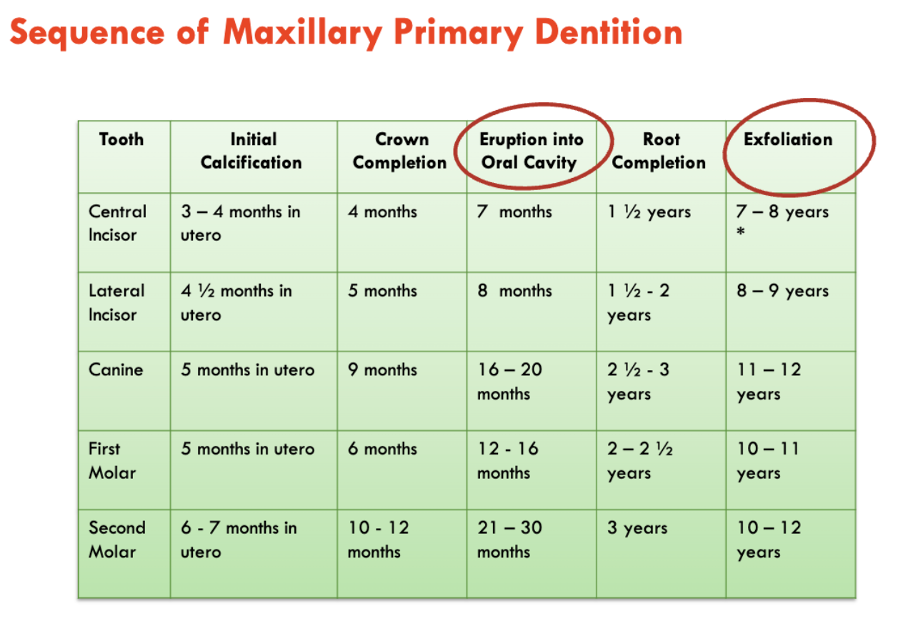
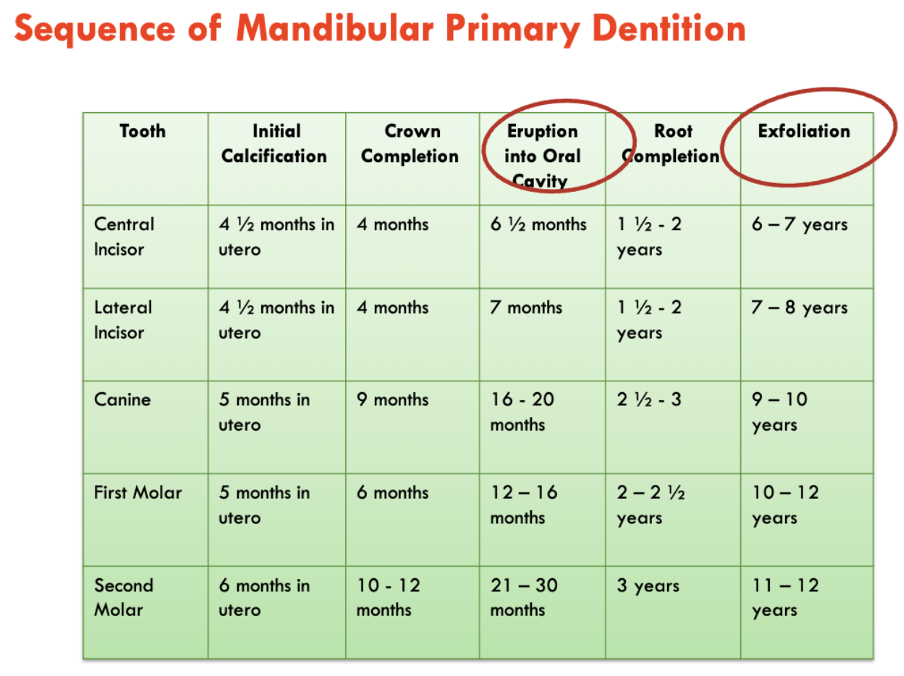
See the Foundations table above for morphology cues. Common trap: critical error charting an erupting permanent tooth as its primary predecessor (or vice versa) — always cross-check size/colour/shape and ask about recent exfoliation.
Tooth mobility (Miller)
Grade
Finding
0 (Normal)
Physiological mobility only; stable
1 (Slight)
Detectable mobility, horizontal movement up to 1mm
2 (Moderate)
Horizontal mobility >1mm, no vertical movement
3 (Severe)
Horizontal >1mm plus vertical/axial depressibility in socket
A generalised severe perio patient tends to show many Grade 1's with several Grade 2/3's rather than one isolated tooth — mobility charting is not optional, you legally can't stage/grade or charge a full periodontal exam item without it.
Occlusion classification
Permanent dentition — Angle's classification
Feature
Class I
Class II Div 1
Class II Div 2
Class III
Molar relationship
MB cusp of max 1st molar = buccal groove of mand 1st molar
Mandibular molar distal
Mandibular molar distal
Mandibular molar mesial
Jaw relationship
Normal skeletal base
Mandibular retrusion
Mandibular retrusion
Mandibular protrusion
Incisors
Normal (may crowd)
Maxillary proclined
Maxillary centrals retroclined
Mandibular incisors often ahead
Overjet
Normal
Increased
Normal/slight increase
Reduced/negative
Overbite
Normal
Often increased
Deep bite common
Variable
Profile
Straight
Convex
Mildly convex
Concave
Primary dentition — terminal plane relationships
Feature
Flush terminal plane
Mesial step
Distal step
Distal surfaces of 2nd primary molars
Same vertical plane
Mandibular distal surface more mesial
Mandibular distal surface more distal
Likely permanent outcome
Class I (after mesial shift) or mild Class II
Class I (most common) or Class III if pronounced
Class II
Malocclusion risk
Moderate
Low (if mild)
High (Class II tendency)
Mesial shift = mesial movement of mandibular 1st permanent molars relative to maxillary molars, because the mandible is where arch length changes.
Type
Mechanism
When
Early mesial shift
Uses primate spaces
Early mixed dentition
Late mesial shift
Uses leeway space
After primary molars exfoliate
Feature
Primate space
Leeway space
Definition
Natural spacing in primary dentition
Size difference: primary teeth vs their permanent successors
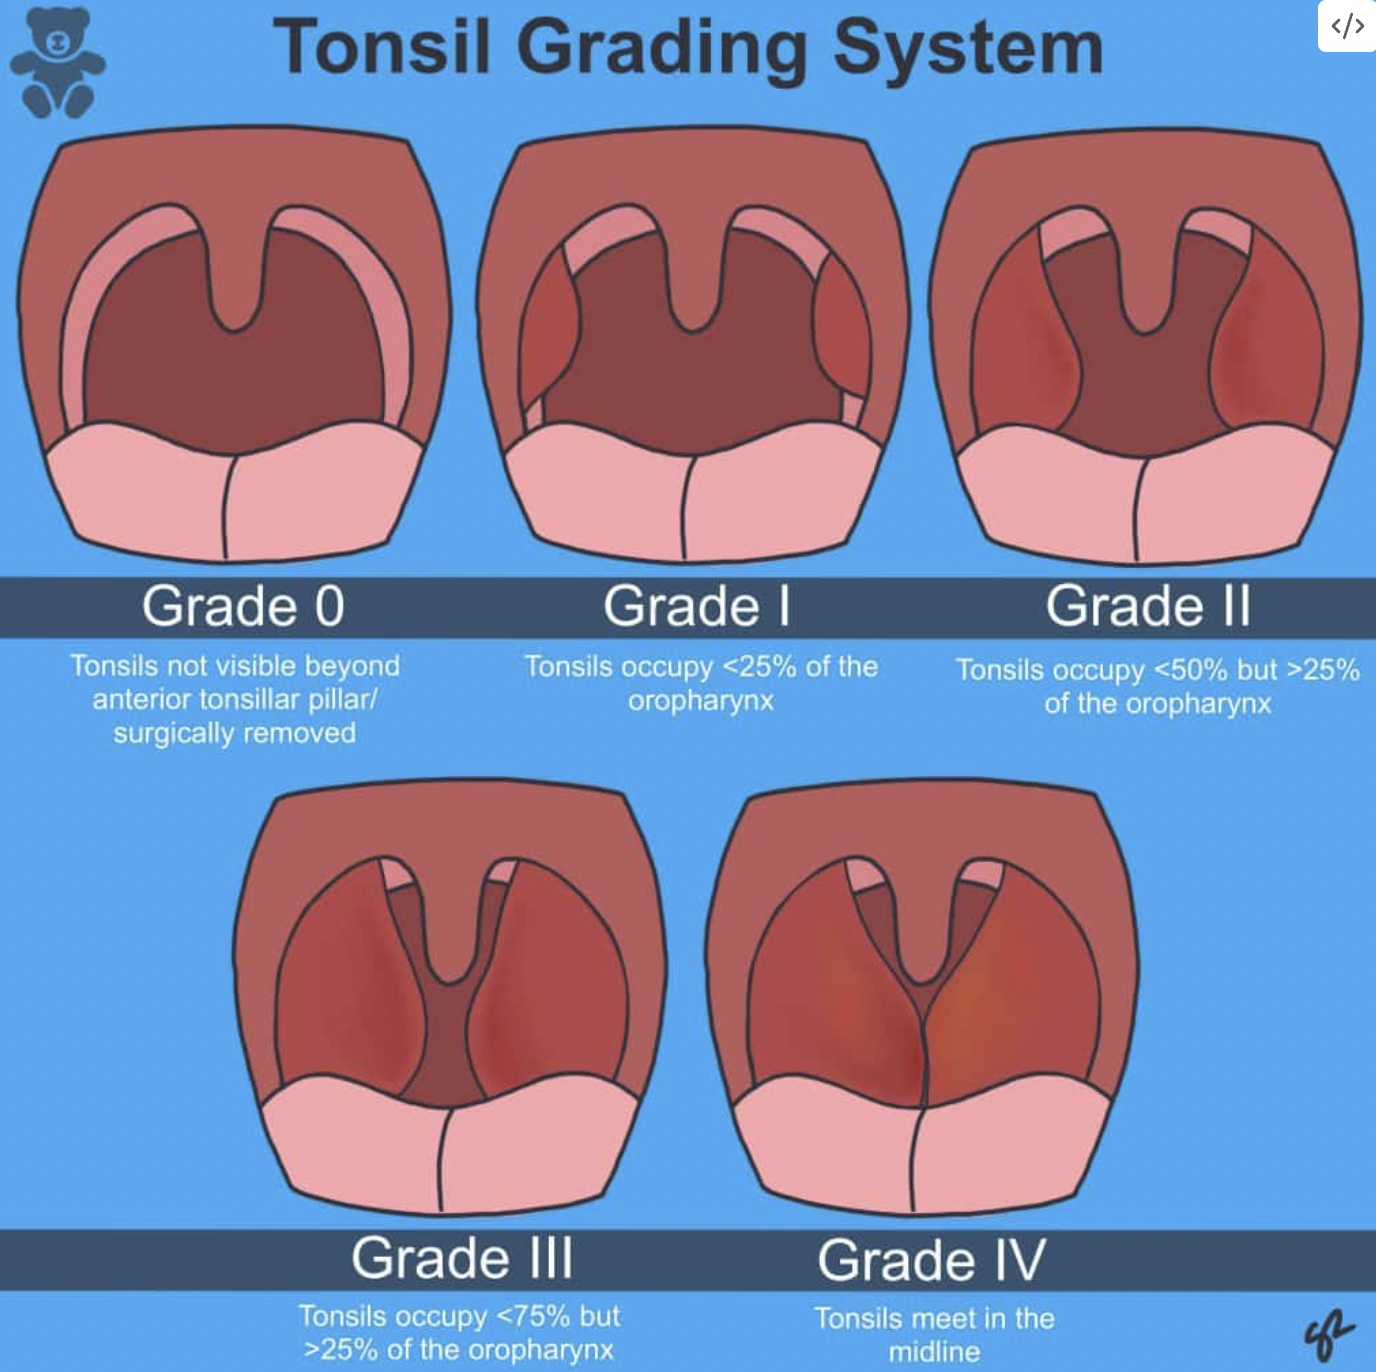
Part of a thorough EO/IO exam, especially relevant for airway/sedation risk assessment and snoring/mouth-breathing history: tonsils are graded 0–IV by how much of the oropharynx they occupy.
Grade 0 = not visible beyond the anterior pillar; Grade IV = tonsils meet at the midline
Caries risk & X-ray interval
Children — caries risk
Risk
Clinical review
BW
OPG
Low
6–12 mo
12–24 mo
Not routine (~8–9y if indicated)
Moderate
6 mo
12–18 mo
Case-based
High
3–6 mo
6–12 mo
Case-based
Adults — caries risk
Risk
Clinical review
BW
OPG
Low
12 mo
24–36 mo
~5y if needed
Moderate
6–12 mo
12–24 mo
Case-based (~5y)
High
3–6 mo
6–12 mo
Not routine
Adults — periodontal risk
Risk
Clinical review
BW
OPG
Stable/Low
12 mo
24–36 mo (renew ≥ every 3y)
~5y overview (renew ≥ every 5y)
Moderate
3–6 mo (SPT)
12–24 mo
Case-based
Severe/Active
3–4 mo (SPT)
6–12 mo
Not routine
After subgingival/deep clean → review at 6 weeks, then 3 months.
Memory shortcut: Review — high risk 3–6mo, low risk 6–12mo (kids)/12mo (adults). BW — high 6–12mo, low 12–36mo. OPG — kids ~8–9y if indicated, adults ~5y not routine. Always follow ALARA. Clinical review interval is risk-based, never fixed.
OPG timing rules of thumb: 11-year-old — palpate for unerupted canine roots buccally first; if roots are palpable, an OPG may not be needed. 17-year-old — probe distal of 7s first; if pocket depth >4mm, refer for extraction of the 8 (before/without OPG).
Crown & bridge types (recognition only — not OHT scope)
Adult crown/bridge restorations use a different set of materials to paediatric SSC, each with different strength/aesthetic trade-offs. Placing these is outside OHT scope — this is here purely so an existing crown can be correctly identified and checked during an exam, not as a procedure to perform.
Type
Composition
Notes
All-ceramic (all-porcelain)
Lithium disilicate, feldspathic porcelain
Excellent aesthetics, no metal underneath; common for anterior teeth
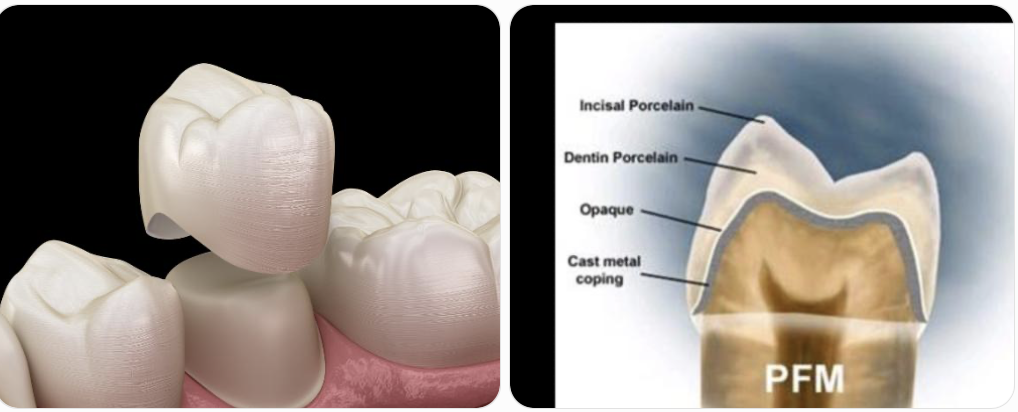
Porcelain-fused-to-metal (PFM)
Metal coping covered by porcelain
Stronger than all-ceramic; common posterior/older restorations; metal can become visible if porcelain chips, gingiva recedes, or occlusal adjustment exposes it
Full metal
Gold alloy, high noble alloy, base metal alloy
Extremely durable; usually posterior; metallic appearance throughout
Zirconia
Monolithic or layered zirconia
Very strong, tooth-coloured; increasingly common
Resin/composite
Composite resin
Usually temporary/provisional; less wear resistant
Left: a crown seated over a prepared tooth. Right: PFM cross-section — porcelain layered over a cast metal coping.
Why would a porcelain crown show an irregular metallic surface? Most likely a PFM crown. Common reasons, roughly in order of likelihood: occlusal adjustment after cementation ground through the porcelain, exposing metal (usually irregular, not smooth); porcelain chipping (cohesive fracture) exposing the coping; wear over many years on heavy occlusal contacts; an intentionally-designed metal occlusal surface/functional cusp for strength; or a poorly finished restoration. Pearl A uniform shiny metal occlusal surface suggests an intentional metal-occlusal design; small irregular metallic patches within porcelain suggest wear/chipping; a grey line at the cervical margin suggests an exposed coping from gingival recession.
Detecting caries beneath an existing crown
A full-coverage crown can mask caries on both clinical exam and radiographs, so diagnosis relies on combining several lines of evidence rather than any single test:
Clinical exam (most important): softness at the crown margin with a ball-ended probe/gentle explorer (avoid forceful probing), marginal gaps or open margins, staining at a defective margin (stain alone isn't diagnostic), localised plaque accumulation or gingival inflammation around one crown, food impaction, crown mobility/looseness.
Bitewings: may reveal recurrent caries at the crown margins (especially proximal) or radiolucency extending beyond the margin — but caries beneath the metal coping itself usually can't be visualised.
Periapicals: useful for periapical pathology, loss of supporting bone, and occasionally recurrent caries near accessible margins.
Symptoms: cold sensitivity (if vital), pain on biting, food trapping, bad taste/recurrent swelling, a history of the crown debonding.
When it stays uncertain: monitor if risk is low and findings are equivocal; if there's a defective margin, symptoms, or high clinical suspicion, the crown may need to be removed to directly inspect the tooth — often the only definitive way to diagnose caries hidden under a full-coverage crown.
My Case — Submerged Primary Molars
MY CASE A young patient presented with submerged primary second molars and clinically/radiographically absent permanent first premolars on one side, alongside submerged primary molars with the permanent successors visibly erupting underneath on the other side. Management differed by case: where the successor was congenitally absent, early referral to orthodontics plus extraction of the submerged primary tooth was planned — both to help the adjacent unerupted canine come through in a better position, and to stop the submerged tooth sinking further subgingivally. Where the successor was actively erupting underneath, extracting the primary tooth simply let the permanent tooth come through. Pearl Always take a PA to rule out ankylosis and an OPG to check permanent successor position/eruption timing before deciding which path applies. Missing permanent second premolars is relatively common; missing first premolars/molars congenitally is rare — a rare finding like that should prompt a double-check of the OPG rather than an assumption of reporting error.
Pain History & Acute Care
SOCRATES pain history
Letter
Meaning
What to ask
S
Site
Where is the pain? Can you point to it?
O
Onset
When did it start? Sudden or gradual? What were you doing?
Constant or intermittent? Duration? Worse at certain times?
E
Exacerbating/relieving
Hot/cold/sweet? Biting? Medication?
S
Severity
Pain score /10? Effect on daily life?
Acute care differentials
Sinusitis — inflammation of sinus linings (viral/bacterial/allergic), facial pressure/pressure worse bending forward, nasal congestion, discoloured mucus, can present as maxillary posterior tooth pain/toothache. Acute lasts 7–10 days, chronic can exceed 12 weeks.
Pericoronitis — inflammation/infection of gum around a partially erupted tooth (classically a lower wisdom tooth), trapped food/bacteria under the operculum. Pain, swelling, halitosis, pus; severe signs include trismus, jaw/cheek swelling, fever, lymphadenopathy. Most common age 17–25 (wisdom teeth emerging) and with crowding/lack of space.
Radiographic caries pearl
If a patient reports pain on a tooth but percussion is also positive on the adjacent tooth and no obvious cavitation is visible, take a BW covering both teeth rather than assuming which one is at fault — then follow up with a PA only once a specific tooth needs periapical assessment (e.g. deep caries reaching the pulp, to decide restore vs extract vs refer).
Radiation stewardship: don't order multiple PAs "just in case" — if an OPG hasn't been taken yet and there's no active acute concern, take the OPG first rather than 2–3 separate PAs, to avoid unnecessary dose.
My Case — Facial Swelling & Epilepsy
MY CASE A patient presenting with systemic facial swelling was checked for fever first — if systemically unwell, an IAN block is contraindicated and antibiotics are needed before any LA/treatment proceeds; once the swelling was confirmed localised/settling, treatment went ahead with articaine buccal infiltration for the affected area (articaine penetrates bone better than lidocaine, useful near a buccal abscess). Separately, taking a pain/medical history from a patient with epilepsy was a good reminder that a positive history needs full follow-through, not just a checkbox: ask about the time of their last seizure, seizure type(s), known triggers, current medication, and typical severity — this level of detail changes same-day risk assessment, not just long-term planning.
Medical History
Taking a medical history: don't limit questions to tablets/oral medication only — ask about other routes too, e.g. for arthritis, ask whether the patient has any injections and where. It's also fine not to know a medical condition off the top of your head; looking it up in front of the patient is acceptable and not expected knowledge for every condition, so long as the follow-through questions (triggers, severity, medication, control) still get asked once you understand it. Pearl
Medical Emergencies
A medical emergency can present as, or alongside, a patient already in the chair, so it sits here alongside the rest of medical history. General framework: DRSABCD — Danger, Response, Send for help, Airway, Breathing, Circulation, Defibrillation. Always call for emergency assistance early if in doubt.
Emergency
Recognise
Immediate response
Vasovagal syncope
Pale, sweaty, light-headed, brief loss of consciousness, often triggered by anxiety/pain/sight of needle
Lay patient flat, raise legs, loosen tight clothing, ensure airway, monitor pulse — usually recovers within a minute or two
Hypoglycaemia (known diabetic)
Sweating, confusion, shaking, pale, hunger; can progress to reduced consciousness
If conscious: oral sugar/glucose. If reduced consciousness: do not give oral anything, call for help, manage airway, escalate
Asthma attack
Wheeze, breathlessness, difficulty speaking in full sentences, use of accessory muscles
Sit upright, use their own reliever (blue) puffer via spacer if available, 4 puffs, repeat every 4 mins if needed; call for help if not improving
Anaphylaxis
Rapid onset — swelling of lips/face/throat, hives, difficulty breathing, drop in BP, sense of doom
Call for emergency help immediately, adrenaline autoinjector if available/trained, lay flat (unless breathing difficulty — sit up), high-flow oxygen if available
Seizure
Sudden loss of consciousness with convulsive movements (tonic-clonic), or absence-type staring episode
Protect from injury (clear the area, cushion head), do NOT restrain or put anything in the mouth, time the seizure, recovery position once movements stop, call for help if >5 minutes or repeated seizures
This table is a recognition/first-response aid, not a substitute for formal BLS/medical emergencies training — always follow the treating clinic's actual emergency protocol and drug kit.
Allergies & Anaphylaxis Risk
Ask: what specifically happens on exposure (rash/hives vs swelling vs breathing difficulty vs collapse — mild intolerance is not the same as true allergy); the specific trigger(s) — latex, penicillin/other antibiotics, NSAIDs/aspirin, local anaesthetic (true LA allergy is rare; most "LA allergy" histories are actually a vasovagal episode, adrenaline palpitations, or a reaction to the sulfite preservative — worth clarifying which), iodine, chlorhexidine, metals (e.g. nickel), latex-associated foods (banana, kiwi, avocado); severity of the worst past reaction and whether it needed hospital treatment; whether they carry an adrenaline autoinjector (EpiPen, Anapen) and — critically — whether they have it with them today and it isn't expired; whether the patient (or a carer) is trained/confident to use it; whether they wear a MedicAlert bracelet/pendant.
Precautions: if no autoinjector is present at a known-anaphylaxis appointment, treat this as a reason to check the clinic's own adrenaline/emergency kit is stocked and accessible before starting, not just proceed as normal. Flag the confirmed allergen clearly in the chart and cross-check it against every material used that day — gloves/dam (latex), antibiotics prescribed, LA cartridge (some contain sulfites), disclosing/impression materials, disinfectants (chlorhexidine, iodine). If a reaction does occur, manage as Anaphylaxis in the Medical Emergencies table above — call for help immediately, use the patient's own autoinjector if available/trained, lay flat unless breathing is difficult. Food/meds: not fasting-related; just confirm any antihistamine they normally carry/take is unaffected, and that today's autoinjector is physically in the room, not just "at home."
Asthma
Ask: extrinsic (allergic) or intrinsic; known triggers (exercise, cold air, dust, smells, stress, NSAIDs/aspirin); how often the reliever is used (more than 2×/week suggests poor control); date of last attack; any ED visit, hospital admission or ICU/intubation; current medications and whether they've been taken today; whether they have their reliever with them.
Puffer type
Colour
Examples
Purpose
Reliever
Blue
Salbutamol (Ventolin), terbutaline (Bricanyl)
Rapid-onset bronchodilator — used PRN/during an attack, not daily
Precautions: confirm the reliever puffer is chairside before starting; avoid known triggers where possible (strong odours, cold dry air from A/C); if aspirin-exacerbated respiratory disease is suspected, avoid NSAIDs and use paracetamol; short morning appointments if exercise/cold-triggered; well-controlled asthma needs no treatment modification, poorly controlled (frequent reliever use, recent ED/hospital visit) — treat cautiously and consider deferring elective care until reviewed. Food/meds: no fasting requirement; just confirm the preventer was taken as normal.
Hypertension (High Blood Pressure)
Ask: how long diagnosed; current antihypertensive medication and compliance; date/result of last BP check; symptoms (headache, visual disturbance, chest pain); other cardiovascular history.
Category
Systolic / Diastolic (mmHg)
Dental relevance
Normal
<120 / <80
No modification needed
Elevated
120–139 / 80–89
Monitor; routine treatment fine
Stage 1 (mild–moderate)
140–159 / 90–99
Routine treatment generally fine; stress reduction protocol
Stage 2 (severe)
160–179 / 100–109
Caution; consider medical review before elective treatment
Hypertensive crisis
≥180 / ≥110
Defer elective treatment, refer urgently
Precautions — LA: adrenaline-containing LA is generally safe in controlled hypertension at conventional doses, aspirate before injecting and inject slowly; avoid in uncontrolled/severe hypertension. Non-selective beta-blockers + adrenaline can trigger a hypertensive episode — limit adrenaline dose if the patient is on one. Take a chairside BP reading if there's no recent value or a history of poor control. Food/meds: continue antihypertensives as normal; no fasting requirement.
Hyperlipidaemia (High Serum Lipids / Cholesterol)
Ask: on a statin or other lipid-lowering therapy; any associated cardiovascular disease (angina, MI, stroke, peripheral vascular disease); family history.
Marker
Target range
Total cholesterol
<5.5 mmol/L
LDL ("bad" cholesterol)
<2.0 mmol/L (high-risk patients)
HDL ("good" cholesterol)
>1.0 mmol/L (men), >1.3 mmol/L (women)
Triglycerides
<2.0 mmol/L
Precautions: hyperlipidaemia itself has no direct LA/dental contraindication, but treat it as a marker of cardiovascular risk — screen for undiagnosed angina/hypertension and use a stress reduction protocol. Some macrolide antibiotics (erythromycin, clarithromycin) increase statin levels and myopathy risk — prefer amoxicillin, or azithromycin with caution, if antibiotics are needed. Food/meds: confirm statin taken as normal; no fasting requirement.
Diabetes Mellitus
Ask: Type 1 or Type 2; how well controlled (home glucose monitoring, known HbA1c); time and content of last meal; insulin/medication dose and timing; history of hypoglycaemic episodes and their warning signs; any complications (renal, cardiovascular, delayed healing).
Measure
Normal / target range
Note
Fasting glucose
4.0–6.0 mmol/L
<4 mmol/L = hypoglycaemia
Random glucose
<11.1 mmol/L
Higher suggests poor control
HbA1c
<7% (53 mmol/mol)
Well-controlled target
Hypoglycaemia alert
<4.0 mmol/L
Level 2 (serious) <3.0 mmol/L
Precautions — LA: no restriction. Food/meds: confirm the patient has eaten and taken their usual medication/insulin before the appointment — never treat a diabetic patient who has skipped a meal or dose. Prefer morning appointments 1–2h after breakfast and medication, avoiding peak insulin action. Keep oral glucose/sugar on hand and watch for hypo signs during treatment (see Medical Emergencies table above). Diabetics have higher infection risk and delayed healing — treat active infection promptly and consider antibiotic cover for surgery in poorly controlled patients.
Ask: specific diagnosis; stents/bypass/pacemaker and when fitted; anticoagulant or antiplatelet medication; whether they carry a GTN spray and how often it's used; exercise tolerance/angina frequency; date of last cardiac event; any history of infective endocarditis or a high-risk valve/prosthetic condition.
Precautions — LA: limit adrenaline (roughly 2 cartridges of 1:100,000 as a conservative rule in significant IHD), aspirate, inject slowly. Have the patient's GTN spray accessible if they have angina. Elective treatment is usually deferred for 6 months post-MI/stent unless the cardiologist clears it earlier. Antibiotic prophylaxis for infective endocarditis is not routine for all cardiac patients under current guidelines — it applies only to specific high-risk conditions (prosthetic valve, previous IE, certain congenital heart disease, cardiac transplant with valvulopathy); check current guidance and liaise with the patient's cardiologist/GP if unsure. Older non-shielded electrosurgery/ultrasonic units can theoretically interfere with pacemakers — check with the cardiologist if uncertain. Food/meds: do not stop antiplatelet/anticoagulant medication without medical advice; use a stress reduction protocol and short morning appointments.
Anticoagulant & Antiplatelet Therapy
Ask: which drug and dose (warfarin, DOAC — dabigatran/rivaroxaban/apixaban, aspirin, clopidogrel); indication (AF, DVT/PE, valve, stent); INR and when last checked if on warfarin; any personal bleeding history; other conditions affecting bleeding (e.g. liver disease).
Measure
Normal / therapeutic range
INR (most indications, on warfarin)
2.0–3.0 (some mechanical valves 2.5–3.5)
INR check before invasive dental treatment
Ideally within 24h, no more than 72h old
Precautions: do not routinely stop anticoagulant/antiplatelet medication for minor dental procedures — the bleeding risk from stopping usually outweighs the bleeding risk from the procedure. Use local haemostatic measures for extractions/surgery (pressure, sutures, resorbable haemostatic dressing, tranexamic acid mouthwash). Prefer infiltration over regional blocks (e.g. IAN) where possible, as blocks carry a higher haematoma risk in anticoagulated patients — proceed with caution if a block is needed. Schedule early in the day/week to allow monitoring. Never adjust a patient's anticoagulant dose yourself — any change goes through the prescriber. Food/meds: confirm the medication was taken as normal; no fasting requirement.
Epilepsy
Ask: seizure type(s); date of the last seizure; known triggers (stress, flashing lights, sleep deprivation, missed medication); current medication and compliance; typical duration/severity and any aura/warning sign; what the patient wants done if a seizure occurs in the chair. (See the "My Case — Facial Swelling & Epilepsy" note in Pain History & Acute Care — a positive history needs full follow-through on all of these, not just a checkbox.)
Precautions: keep appointments short and low-stress; avoid known triggers (e.g. a flickering overhead light if photosensitive); confirm medication was taken as normal. If a seizure occurs, manage per the Medical Emergencies table above — protect from injury, do not restrain or put anything in the mouth, time it, recovery position once movements stop, call for help if >5 minutes or repeated. Food/meds: no fasting requirement; missed medication is a key risk factor to ask about.
Pregnancy
Ask: trimester/expected due date; any pregnancy complications; current obstetric care; medications.
Precautions: elective dental treatment is best scheduled in the 2nd trimester. Avoid non-urgent radiographs; when genuinely needed, standard shielding (lead apron, thyroid collar) makes them low-risk, but defer anything non-essential. Avoid supine positioning in the 3rd trimester (supine hypotensive syndrome) — use a semi-reclined position or left lateral tilt. LA — lidocaine is safe at standard doses. Avoid NSAIDs, especially in the 3rd trimester (risk of premature ductus arteriosus closure) — paracetamol is the preferred analgesic. Keep appointments shorter for comfort. Food/meds: no fasting requirement.
Previous Surgery & Hospitalisation
Ask: type of surgery and date; reason; any complications (bleeding, anaesthetic reactions, infection); current recovery status; ongoing medications or devices related to it (joint prosthesis, cardiac device, VP shunt); any family history of malignant hyperthermia or personal GA reactions if sedation/GA is planned.
Precautions: recent major surgery or hospitalisation (<6 weeks) may mean deferring elective dental treatment until medically stable. For joint prostheses, antibiotic prophylaxis is not routinely required under current guidance unless the orthopaedic surgeon has specifically advised it (e.g. immunocompromise, early post-op period) — don't assume it's needed, check. Confirm anaesthesia history before any planned sedation/GA. Food/meds: confirm current medications and whether any pre-appointment fasting applies (relevant mainly if sedation is planned).
Oral Pathology & Soft Tissue
Describing a lesion — ISBAR
Lesion description checklist (say it in this order): Location · Number · Size · Shape · Colour · Texture · Consistency · Attachment · Other (wipeable? painful? bleeding? mobile? numb?)
ISBAR
Content
I — Identify
Introduce yourself/role; confirm patient name/age/gender; reason for review/referral.
S — Situation
Chief complaint (pain/swelling/ulcer/bleeding/mobility/white lesion/lump) + full lesion description (location, appearance, size/shape, surface, symptoms, associated findings e.g. halitosis, lymphadenopathy, fever).
Vesicles → rupture → ulcers; may have fever/malaise/lymphadenopathy in primary infection
~7–10 days; virus latent, may recur
Most oral ulcers heal in about a week without antibiotics — antibiotics only if clear secondary bacterial infection (cellulitis, spreading infection, systemic signs).
Variations of normal
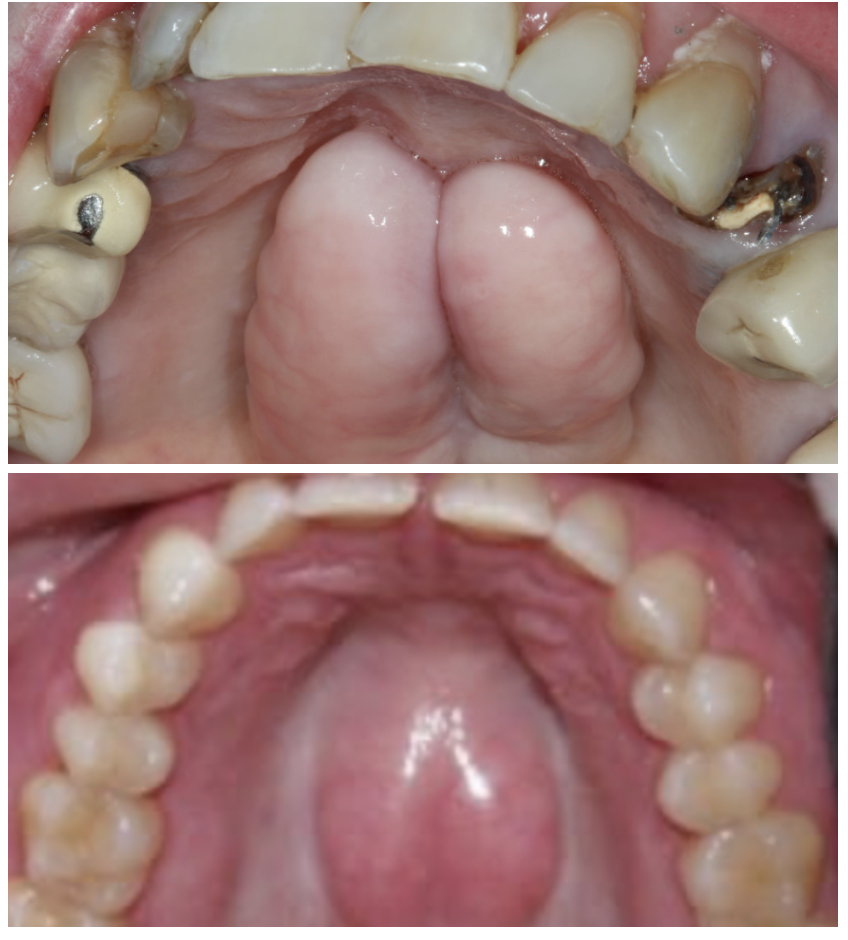
Palatal tori / palatal exostoses (hard bone — very rare in kids)
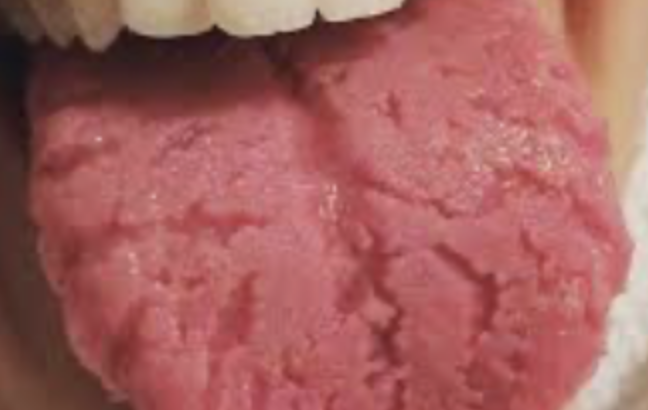
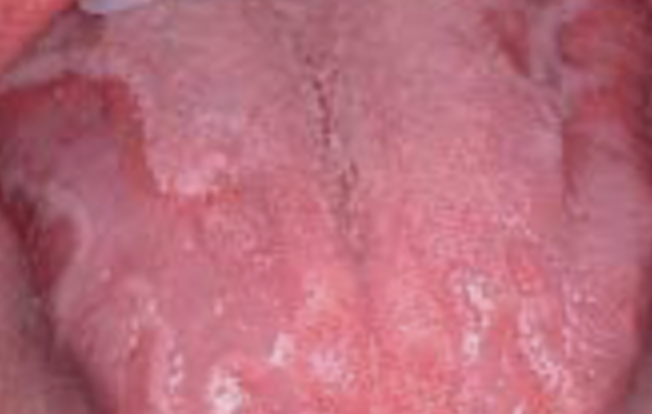
Fissured tongue, geographic tongue
Lingual tonsil (tonsil tissue anterior to the tongue base)
Racial pigmentation
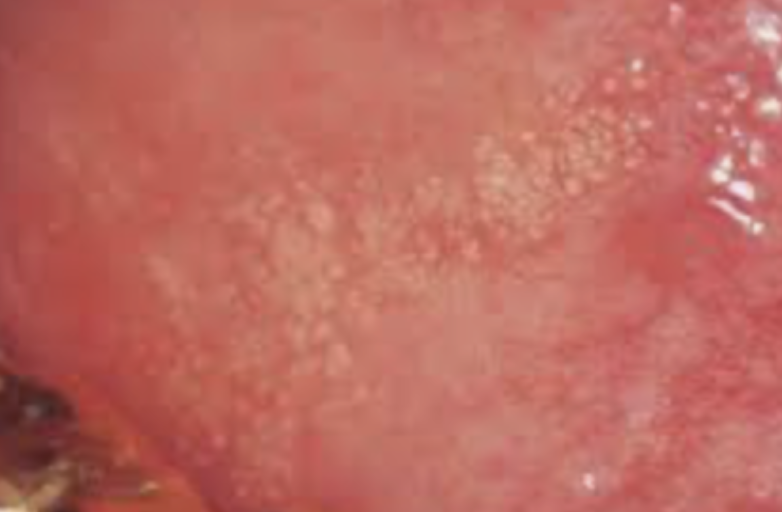
Fordyce granules (buccal mucosa, more prominent with age)
Lingual varicosities, sublingual caruncles
Enlarged incisive papilla (soft — vs tori which is hard bone)
Thickened/elongated frenum
Palatal tori (torus palatinus) — hard, bony midline swelling; rare in children
Fissured tongue
Geographic tongue — atrophy of filiform papillae with a raised white/red border
Fordyce granules — ectopic sebaceous glands, buccal mucosa, more prominent with age
Misc. soft tissue lesions
Lesion
Cause
Presentation
Management
Haemangioma
Blood vessel abnormality with endothelial proliferation; early childhood
Blanches on pressure (BOP), red, bulbous, sensitive; flat or raised
Risk of bleeding — refer for diagnosis/management
Eruption cyst
Follicular enlargement containing blood, over an erupting tooth
Dark, purplish swelling over the alveolar ridge; usually asymptomatic
Usually left alone; surgical uncovering rarely needed
Mucocele
Trauma to a minor salivary gland duct → mucus extravasation
Soft, fluctuant swelling, classically floor of mouth (ranula, sublingual gland) or lower lip
Refer for definitive management (often surgical excision)
Epstein's pearls
Keratin-filled cyst from entrapped epithelium along palatal fusion lines
Small palatal nodules, top of palate, newborn babies
Spontaneous resolution — reassure
White sponge naevus
Autosomal dominant; benign overgrowth of mucosal epithelium
Thickened, folded, spongy, painless, early childhood
Refer to confirm; folds can trap bacteria/growth
Quick differentiator: a soft, fluctuant, bluish swelling on the floor of mouth/lower lip in a child = think mucocele first (trauma-driven duct injury); a dark swelling directly over the path of an erupting tooth = eruption cyst (leave alone unless symptomatic); small pearly nodules on a newborn's palate = Epstein's pearls (normal variant, resolves spontaneously).
Ortho-appliance lesions
Easy to miss — always complete a full soft tissue exam (buccal mucosa, lips/labial mucosa, gingiva, tongue, floor of mouth, palate/oropharynx) in orthodontic patients. Check for ulceration/friction trauma, soft tissue irritation, appliance impingement.
Buccal fibrosis / hyperkeratosis from wires: singular, irregular, elevated, well-defined white lesion caused by wire irritation. Management: orthodontic wax, warm salt water rinses, avoid irritating foods, monitor, refer back to orthodontist if ongoing.
Reasoning pearl If you can't give an accurate diagnosis for a lesion, don't project false reassurance or "just monitor" confidence — refer to a specialist.
White lesions
Condition
Presentation
Risk factors
Management
Leukoedema
Diffuse grey-white, milky, buccal mucosa; disappears on stretching
Smoking, African descent
Reassure, no Tx
White sponge nevus
Bilateral thick, folded white plaques, since childhood
Genetic (AD)
Reassure
Morsicatio buccarum (frictional keratosis)
Shredded, irregular white patches along occlusal line
Biopsy (premalignant), sun protection, ± 5-FU/cryotherapy
Exam-ready logic: Wipeable → candidiasis. Bilateral & symmetrical → usually benign (leukoedema, lichen planus). Non-wipeable + persistent (>2–3wks) → biopsy. High-risk sites for malignancy: lateral border of tongue, floor of mouth, retromolar area. PVL and actinic cheilitis carry high malignant risk.
Reasoning method for any white lesion case (from tutorial cases): 1) Describe systematically 2) Give 2–3 differentials 3) Explain why it looks white (hyperkeratosis / intracellular oedema / fungal pseudomembrane / surface coating) 4) Management 5) Red flags 6) Risk factors. e.g. a well-demarcated non-wipeable white patch next to a sharp/fractured cusp is most likely frictional keratosis — smooth the cusp, review in 2–3 weeks; if it persists despite removing the irritant, biopsy.
Denture hygiene, remove overnight, antifungal, adjust fit
Erythema with history of white lacy striae
Erosive oral lichen planus
Epithelial damage + inflammation
Topical corticosteroids, avoid triggers, review
Diffuse red, bleeding gingiva
Plaque-induced gingivitis
Inflammation → vasodilation
OHI, scaling, plaque control
Localised blue-grey macule near a restoration
Amalgam tattoo
Exogenous metal in connective tissue
No Tx; confirm on radiograph ± biopsy if uncertain
Bluish, compressible lesion, enlarges with pressure
Vascular malformation
Blood-filled vessels
Usually monitor; refer if symptomatic
Small, stable brown macule (e.g. lip)
Melanotic macule
↑ melanin in basal layer
Reassure; monitor for change (ABCDE)
Painless ulcer, indurated edges, clean base
Primary syphilis (chancre) — consider if sexual hx fits
Fibrin slough over ulcer base
Refer for serology, contact tracing
Vesiculobullous disease
high yieldDesquamative gingivitis is a descriptive term, not a diagnosis — erythema/desquamation/erosions/ulcers/vesicles/bullae of free + attached gingiva. Main causes: Pemphigus vulgaris, Mucous membrane pemphigoid, erosive/bullous oral lichen planus.
Feature
Pemphigus Vulgaris (PV)
Mucous Membrane Pemphigoid (MMP)
Mechanism
Autoantibodies vs desmosomes (desmogleins) → intraepithelial split
Autoantibodies vs hemidesmosomes/basement membrane → subepithelial split
Blister
Fragile, flaccid
More intact
Gingivitis
Yes (desquamative)
Yes (desquamative)
Scarring
Rare
Common
Eye involvement
Less common
Important — can cause blindness
DIF pattern
"Fish-net/fish-scale" (intercellular IgG)
Linear IgG at basement membrane
Severity note
Can be life-threatening (fluid/protein loss, secondary infection, sepsis, cardiac failure)
Hypersensitivity types (for context): Type I = immediate IgE (anaphylaxis, asthma). Type II = cytotoxic (PV, bullous pemphigoid). Type III = immune-complex (RA, SLE). Type IV = delayed T-cell mediated (EM, Type 1 diabetes, MS) — NOT antibody-mediated, NOT immediate (common exam trap).
Reactive gingival lesions
Lesion
Appearance
Typical patient
Key feature
Fibrous epulis
Firm, pink gingival lump
Any age
Chronic local irritation; arises from PDL/gingival CT
Pyogenic granuloma
Bright red, soft, bleeds easily
Pregnancy, young people
Lobular capillary haemangioma — not pyogenic, not a granuloma
Peripheral giant cell granuloma (PGCG)
Red-purple gingival swelling
—
Multinucleated giant cells; mandible > maxilla; associated with hyperparathyroidism
Peripheral ossifying fibroma (POF)
Pedunculated, smooth-surfaced mass
Young females
Arises from interdental papilla/PDL; maxilla > mandible
Oral oncology & OPMDs
Oral potentially malignant disorders (OPMDs) are a heterogeneous group of lesions with a risk of progressing to oral squamous cell carcinoma (OSCC). Main risk factors: tobacco, alcohol, areca nut, HPV-16.
Alcohol use
Oral cavity/pharynx cancer risk
Laryngeal cancer risk
Moderate drinkers
1.8× higher
1.4× higher
Heavy drinkers
5× higher
2.5× higher
High-risk sites (same as white-lesion risky sites): lateral border of tongue, floor of mouth, retromolar area. Any lesion here that is non-healing, ulcerated, indurated, or persists beyond 2–3 weeks needs urgent referral + biopsy.
Reasoning pearl If you can't give an accurate diagnosis for a lesion, don't project false reassurance or "just monitor" confidence — refer to a specialist.
Prevention — Fluoride, Sealants & Materials
Fluoride modalities
Modality
Indication
Frequency
Age
Notes
Toothpaste 1000–1450ppm
General prevention
2×/day
≥6y
Standard care
Toothpaste 5000ppm
High caries risk
2×/day
≥16y
Spit, don't rinse; prescription
Fluoride varnish 22,600ppm (Duraphat)
Moderate–high risk
3–6 monthly
All ages
Professional application
Fluoride mouthrinse 0.05% NaF
Moderate risk / ortho
Daily
≥6y
Needs compliance
Fluoride mouthrinse 0.2% NaF
Higher risk
Weekly
≥6y
Alternative regimen
SDF 38%
Active caries arrest
6–12 monthly
All ages
Black staining, non-aesthetic
Fissure sealant
Occlusal caries prevention
Review 6–12 monthly
Children/adolescents
Reapply if lost
GIC (fluoride-releasing)
High risk / ART
Case-dependent
All ages
Adjunct benefit
Toothpaste fluoride by age
Concentration
<6y
500–1000ppm
6–16y
1000–1450ppm
≥16y, high risk
2800–5000ppm
5000ppm toothpaste: use for at least 3–6 months initially, continue while high risk persists (can be long-term), review every 3–6 months, step down to 1450ppm once risk reduces.
Duraphat (fluoride varnish)
Patient group
Max dose/application
≈ Fluoride
Children <6y
0.25mL
~5.65mg
Children 6–12y
0.40mL
~9mg
Adolescents/adults
0.75mL
~17mg
Applied 2–4×/year (every 3–6 months by caries risk).
If swallowed: nausea, vomiting, abdominal discomfort
POIG
Avoid hard foods for 4 hours
Avoid brushing/flossing until next morning
Soft foods only for the rest of the day
Avoid hot drinks/alcohol for several hours
Teeth may look rough/yellow temporarily — normal, disappears after brushing
Molar-Incisor Hypomineralisation (MIH)
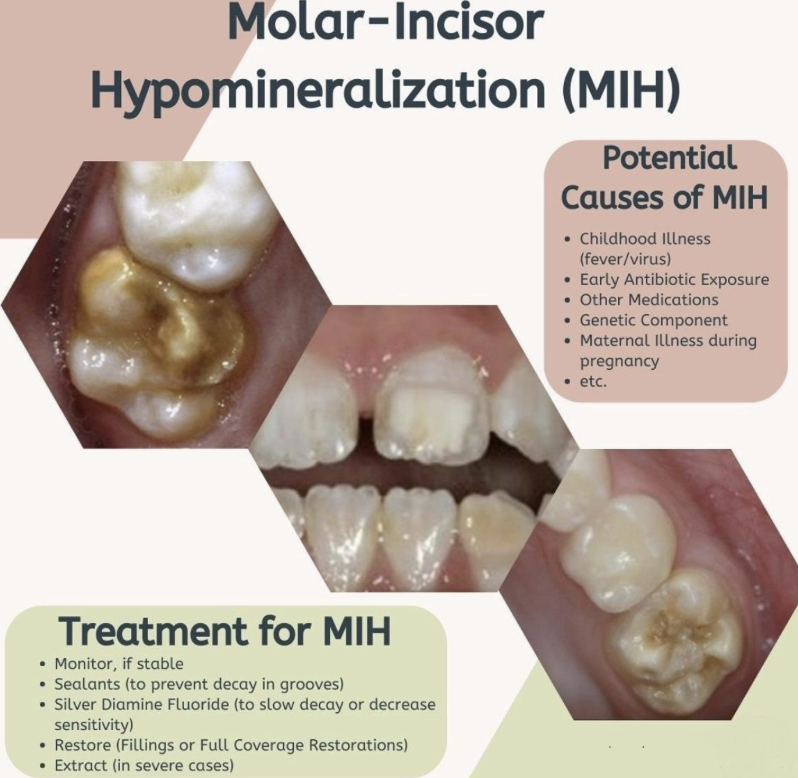
MIH affects first permanent molars (± incisors): demarcated, qualitatively abnormal enamel that is porous and breaks down under masticatory load, often causing post-eruptive breakdown and marked sensitivity. Possible causes: childhood illness/fever, early antibiotic exposure, other medications, genetic component, maternal illness during pregnancy. Management ranges from monitoring (if stable) → sealants (protect grooves from breakdown) → SDF (slow decay/reduce sensitivity) → restore (fillings or full-coverage) → extract (severe cases, coordinated with orthodontic timing).
MIH — demarcated opacities and post-eruptive breakdown on molars/incisors, with causes and management options
FS vs FP (sealant vs protection)
Factor
FP (GIC)
FS (Composite)
Caries status
Early enamel lesion present (ICDAS 1–2)
Sound fissure (no caries)
Purpose
Arrest early demineralisation
Prevent future caries
Moisture control
Used when isolation is difficult
Requires excellent isolation
Eruption stage
Partially erupted molars
Fully erupted teeth
Longevity
~6 months – 2 years
~3–5 years
Rule: FP (GIC) → early caries OR poor isolation. FS (composite) → sound fissure + good isolation.
Clinical reasoning example 9-year-old, high caries risk, hypomineralised 6s, previous FP(GIC): prefer FS(composite) if isolation achievable (better retention/long-term seal) — but only once the old GIC is completely gone (otherwise you can only re-apply GIC over it), and fall back to FP if isolation is poor, cooperation limited, or hypomineralisation is severe enough that bonding is unreliable.
Return if bite feels high, or if it chips/falls off/persistent sensitivity
Regular review (6–12 monthly)
Chlorhexidine (CHX)
CHX is an adjunct, like a prescription mouthrinse — not a routine part of standard perio treatment planning and not a substitute for mechanical biofilm disruption/brushing/interdental cleaning/professional debridement.
Indications: gingivitis/plaque control, post-surgical care, acute care, high caries risk (adjunct), patients with reduced OH ability (e.g. disability).
Use: 0.12–0.2%, ~10–15mL, 2×/day, short-term (7–14 days typical); rinse 30–60s then spit (don't swallow, don't rinse with water after); wait ≥30 min after brushing (toothpaste reduces efficacy). Works via substantivity (binds tissue, releases slowly).
Side effects: brown staining, taste disturbance (esp. salt), increased calculus; less common — mucosal irritation, dry mouth/burning; rare — parotid swelling, hypersensitivity.
My Case — Prophylaxis Technique
MY CASE During a routine prophylaxis polish, excessive pressure and rotational force wore straight through two prophy cups. The fix coached on the spot: use light, controlled pressure, reposition the cup regularly instead of holding it static in one spot, adapt it around tooth contours and the gingival margin, and keep the speed appropriate rather than pressing harder when stains don't lift quickly — chasing stubborn stains with more pressure just damages the cup and risks soft-tissue trauma, not faster cleaning.
My Case — Salicylate-Safe Toothpaste
MY CASE A patient with a salicylate sensitivity was using an unflavoured herbal toothpaste — well tolerated, but with no fluoride content at all. The reasoning: the priority is to get the patient onto a standard fluoride-containing toothpaste (1000–1450ppm for most adults) rather than continue with zero fluoride protection, while still avoiding ingredients that could trigger their sensitivity (flavouring/mint agents are a common source of salicylate-related compounds in toothpaste). Pearl Unflavoured, low-additive fluoride toothpastes made for flavour-sensitive patients (e.g. OraNurse) are a useful option here — an unflavoured 1450ppm fluoride toothpaste gives the caries-preventive benefit without the flavouring agents that are the usual trigger.
High F release, good sealing, easy visualisation (pink); more aesthetic (white)
Weaker bond, not a long-term restorative material
Feature
Conventional GIC (Fuji IX, Equia)
RMGIC (Fuji II LC)
Cure
Self-cure (acid-base)
Light-cure + acid-base
Working time
~1min 15s
~3min
Setting
~2min 30s from mixing
20s light cure
Wear resistance
Higher
Lower
Moisture sensitivity
Lower
Higher
Aesthetics
Moderate
Slightly better
Simple rule: Fuji II LC = RMGIC, light-cure, stronger · Fuji IX = conventional GIC, ART · Equia = reinforced GIC for posterior.
CR material types
The composite protocols below default to the standard layering technique, but composite resin actually comes in a few working consistencies with different placement rules.
Type
Handling
Max increment
Typical use
Notes
Conventional / universal (layering)
Paste-like, sculptable, holds anatomical form
~2mm per layer, LC each layer
Most direct restorations (Class I–V) where contour/anatomy matters — the default used throughout this hub
Most technique-sensitive re: void-free adaptation into line angles
Flowable
Low viscosity, syringe-delivered, self-levelling
~2mm
PRR/small early lesions (ICDAS 1–2), cavity liners under conventional CR, adapting into hard-to-reach corners
Higher polymerisation shrinkage, lower wear resistance — not for load-bearing occlusal surfaces alone
Bulk-fill
Higher translucency + more reactive photoinitiators allow deeper cure
~4mm per layer (check the specific product's stated depth of cure)
Deep proximal boxes, posterior restorations, reducing chair time on large cavities
Usually still capped with a ~2mm conventional layer on top for wear resistance and shade-matching at the occlusal surface
Simple rule: bulk-fill saves time filling the base of a deep box but is rarely left as the final occlusal surface; flowable is for adaptation/lining or small lesions, not as the sole material in a high-load area; conventional/universal stays the default for the visible, load-bearing bulk of most restorations.
ADDED The flowable composite row reflects the flowable-vs-sealant comparison already used for PRR decisions in the Prevention module; the bulk-fill row and the three-way framing are supplementary general knowledge, not from the original placement notes.
Mix GIC (capsule or hand mix, working time ~1–2min)
Place GIC from the base, adapt, slight overfill
Set: Fuji II LC → LC ~20s; Fuji IX → chemical set ~2–4min
Remove wedge first, then Tofflemire
Finish — remove excess, check proximal contact and occlusion
Coat if required (e.g. Equia Coat, LC ~20s) — protects during maturation, improves wear
Why GIC over CR for most primary teeth: excellent rubber-dam isolation is hard to achieve in young children (e.g. primary canines), and GIC tolerates moisture better.
Risks
Lower strength/wear resistance vs composite
Moisture contamination during early set weakens it
Dehydration → cracking
Surface roughness if unprotected
Fracture in high-load areas, marginal breakdown over time
POIG
Avoid eating ≥1 hour
Avoid hard/sticky food 24h
Good OH; reduce sugary snacks
Return if high bite, fracture, or falls out
Regular recall
Common Class II GIC/CR errors seen repeatedly in notes:
Not fully accessing interproximal caries (usually at/below the contact point) — extend further below the contact rather than deeper toward the pulp.
Voids at the gingival margin from forgetting the wedge.
Cutting interproximal gum with a slow-speed bur on equigingival caries — needs very good bur control angled toward the tooth; if bleeding occurs, firm pressure with a cotton pellet for 5 minutes for haemostasis (may be soft-tissue trauma, not pulp exposure — check where the pulp actually is).
Removing marginal ridge / doing an unnecessary Class II when it was really just an O (Class I) lesion — very invasive and against minimal intervention; always double check with BW + clinical appearance whether the contact point is actually involved.
Tofflemire not fully seated → hold stable manually while filling.
Restoring one interproximal surface before confirming its contact point is good, then moving to the next.
CR Restoration — protocol
Paediatric pulp-protection rule: in children, only ~1mm of remaining tooth structure may separate you from the pulp — be very careful with deep preparations ("stop early, reassess often"); prefer selective caries removal over aggressive deep prep.
Material: Composite (e.g. Filtek, Tetric) — anterior & posterior, chosen when good isolation (rubber dam) is achievable, aesthetics/strength are needed, and caries risk is moderate–low.
Steps (with rubber dam)
Pre-op: consent, LA if needed, shade selection before isolation (tooth still hydrated)
RD placement — select clamp, punch tooth-specific hole, place clamp, stretch dam, secure frame, floss contacts, invert dam
Cavity prep — high speed for access, slow speed to remove caries selectively, smooth margins
Matrix (if proximal) — sectional matrix, wedge to seal gingival margin
Composite in ≤2mm increments, LC 20s each layer, build anatomy
Finish/polish, check occlusion, remove RD
Benefits
Aesthetic, adhesive/conservative prep, good strength/wear, immediate set, no mercury.
Risks
Moisture-sensitive → failure if isolation poor
Technique-sensitive (etch/bond errors)
Polymerisation shrinkage → marginal gap
Post-op sensitivity
Not ideal for very high caries risk / poor cooperation
POIG
Avoid eating until LA wears off
Mild cold sensitivity possible (usually temporary)
Avoid hard/sticky food 24h
Good OH
Return if pain persists, high restoration, or food trapping
Deep caries decision table
Situation
Pulp status
Remaining dentine
Material
Rationale
Moderate–deep caries
Vital, asymptomatic/reversible pulpitis
Adequate
Composite ± RMGI base
Routine, minimal pulpal risk
Deep (close to pulp)
Vital, no exposure
Thin but intact
Fuji II LC (RMGI) base + composite
Seals dentine, reduces sensitivity
Very deep (near exposure)
Vital, high exposure risk
Extremely thin
Dycal (indirect pulp cap)
Bioactive, promotes reparative dentine
Micro-exposure (pinpoint)
Vital pulp exposed
None at point
MTA / Biodentine (direct pulp cap)
Excellent seal + pulp healing
Large exposure/irreversible pulpitis
Compromised
—
RCT / extraction
Pulp no longer maintainable
Class-by-class CR technique notes
Class
Key points
I
High-speed round diamond bur to access; slow-speed round carbide + spoon excavator to remove caries; 3-surface layering, each LC 20s; finish with red football bur, polish with white stone.
II
Consider fendle wedge; watch adjacent tooth and soft tissue; sectional matrix (band ~4.5mm)+wedge+ring, ball-burnish for contact; build contact wall first, then box at floor level; finish with Soflex/strip paper.
III
Correct wooden wedge size; Mylar strip placement; build anatomy with flat plastic, hold with thumb+index while curing 20–30s.
V
Apply with flat plastic, shape; avoid deficiency and thick excess. Even without caries, still slow-speed carbide to remove plaque + 1mm bevel with red round bur. Use long fissure bur (not red football) to polish, then white stone.
Recurring critical errors (CR):
Enamel etch time too short (15s instead of 30s) → sealant/restoration falls off with the clamp.
Not checking restoration/occlusion with CE before removing the rubber dam — treated as a professionalism breach.
Polishing lower teeth without a gamer's clamp in place "just for moisture control" reasoning — it's also there to protect the tongue/soft tissue; omitting it has caused tongue lacerations.
Anterior Class IV: isolate a wider span (e.g. from the adjacent canine to the contralateral lateral) with clamp-free isolation, floss ligatures and wedges; bevel buccal ~1mm, chamfer palatal ~1.5mm (wavy); reassess symmetry/contour from multiple angles before final cure.
Root caries (RC) restoration
Equigingival/supragingival RC (or RC with a shallow subgingival extension) can be restored; refer deep subgingival lesions. Code 1 → SDF; Code 2 → GIC (moisture tolerant, fluoride release, non-occlusal-bearing area, biocompatible for the sensitive root/gum region).
Restoration deficiencies
Finding
Management
Staining only
Monitor / polish
Minor gap, no caries
Repair
Marginal breakdown
Redo
Recurrent caries
Redo
Food packing
Redo
Asymptomatic & functional
Monitor
Monitor/repair only if: marginal staining without caries, slight gap without soft dentine, surface roughness, minor anatomical deficiency with no function issue, no packing/sensitivity/symptoms. Redo if: marginal breakdown, recurrent caries, open margin with soft dentine, loss of contact/food impaction, fracture, or symptoms.
Open sandwich technique
Scenario: a very deep caries lesion extends subgingivally. After rubber dam isolation and caries removal, this is the structured, step-by-step approach for its restoration.
Matrix & isolation control: modified Tofflemire (Garrison-type band) to achieve a tight seal at the deep subgingival margin (cut one bump off the band to get it equigingival). Place a wooden or anatomical wedge (may add PTFE tape) to prevent gingival leakage and control fluid — aim equigingival with no overhangs.
Gingival margin conditioning: apply 10% polyacrylic acid (dentine conditioner) for 20s, rinse, and gently blot dry — the surface should stay moist, not desiccated.
GIC placement (the "open sandwich" layer): place conventional GIC (Fuji IX, ~2min working time) or RMGIC (Fuji II LC) in the gingival box, about 1.5–2mm thick as a base. Ensure it covers the gingival cavosurface margin — this layer stays open to the oral cavity, but must stay below the contact point. Light-cure if using RMGIC. Protect with GIC varnish or a resin coat.
Shaping for the composite layer: once the GIC sets, trim and smooth it while keeping the cervical margin open.
Matrix for the composite: take off the Tofflemire, place a sectional (V3) matrix system with a wedge to build up the proximal contact.
Etching & bonding: selective-etch enamel only, 30s with 37% phosphoric acid; universal adhesive to enamel and dentine, LC 10s.
Finishing & polishing: check occlusion and contact with floss.
Final protection & advice: apply a GIC surface coat over any open GIC margin; POIG — advise the patient to avoid food/drink for 1 hour; reinforce good OH.
Open vs Closed Sandwich — the actual difference
Feature
Open Sandwich
Closed Sandwich
GIC exposure
GIC is exposed at the gingival margin (open to the oral cavity)
GIC is completely covered by composite
When used
Margin is on dentine/cementum, subgingival
Margin is on enamel
Benefits
Moisture-tolerant, fluoride release, good seal in a deep/hard-to-isolate margin
Better aesthetics and wear resistance
My Case — Anterior Class IV Composite
MY CASE A technically challenging anterior composite build-up following trauma (fractured central incisor) was a valuable first attempt at this kind of restoration. Technique points worth keeping: isolate a wide span (from the adjacent lateral incisor across to the contralateral lateral) using clamp-free isolation with floss ligatures and wedges for comfort/access/aesthetics — a clamp is harder to manage well on upper anteriors. Select shade before isolation while the tooth is still hydrated, since a dehydrated tooth looks artificially lighter. Bevel the buccal margin ~1mm; chamfer the palatal margin ~1.5mm with a wavy outline (white long-fissure bur, then red flat-fissure bur) — this improves retention, bonding surface area, and blends the margin aesthetically. Build anatomy for symmetry with the adjacent tooth: rounded incisal contour, a slightly bulging facial convexity, smooth line angles — and reassess from multiple angles before the final cure, not just after. Give trauma-specific aftercare (avoid hard foods, maintain OH, watch for pain/discolouration/swelling/restoration failure) and schedule ongoing trauma review appointments, since complications can surface long after the initial visit.
Tofflemire tip: if a molar needs extra width and the band won't seat properly, adjust the middle dial to move the band-retaining slot further from the U-slot before loading the band — this frees more band length to wrap a larger tooth. The same middle dial is then used to tighten the band once it's seated on the tooth.
Pulp Therapy
Pulp proximity rule
The pulp is much closer to the surface in primary teeth. Enamel ~1mm, dentine-to-pulp ~1–2mm (sometimes less over pulp horns) → total surface-to-pulp distance can be as little as ~2mm. Safe prep depth is usually no more than ~1.5mm unless caries dictates deeper removal. High-risk zone: the mesial pulp horn and deep occlusal fissures. Rule: "stop early, reassess often" — prefer selective caries removal over aggressive deep prep. A "normal-looking" depth may already be very close to the pulp because primary teeth have proportionally larger chambers, higher pulp horns, and thinner enamel/dentine.
IPC vs DPC (pulp cap)
Goal: avoid pulp exposure, allow remineralisation, and preserve pulp vitality.
IPC indications (in BOH scope)
Deep caries but no pulp exposure
Vital tooth with no irreversible symptoms (no spontaneous pain, no lingering thermal pain)
No signs of pulpitis beyond reversible (mild cold sensitivity OK)
No periapical pathology — no sinus tract, swelling, or PA radiolucency (otherwise pulp is already necrotic/irreversibly inflamed)
Tooth is restorable
DPC indications (out of BOH scope — should refer)
Small pulp exposure (<1mm) from trauma or a clean mechanical exposure
Vital tooth with no symptoms of irreversible pulpitis (same 3 criteria as IPC above)
Immediate isolation available (rubber dam)
Clean field — exposure not contaminated for long
Healthy surrounding dentine and a restorable tooth
IPC step-by-step
Leave the affected (softened but not frankly infected) dentine on the pulpal floor — do not chase it deeper.
Dentine conditioner 20s (removes smear layer, improves chemical bonding of GIC to dentine) — spot apply only.
Dycal at the deepest point only (mix liquid:paste = 1:1) — pulp protection, stimulates reparative dentine formation.
Fuji II LC as a liner over the Dycal (mix liquid:powder = 1:1, LC 20s) — seals dentine, provides chemical adhesion.
Matrix system (if proximal) with wedge/rings, PTFE tape if needed — prevents overhangs, achieves a tight contact.
Bulk-fill or conventional layering technique — replace lost tooth structure with adequate curing depth per layer, minimise shrinkage.
Check occlusion and contact.
Finish and polish — reduces plaque retention, improves longevity.
POIG + OHI — set post-operative expectations.
DPC step-by-step (dentist scope — know the sequence for understanding/assisting)
RD isolation, high-speed access, slow-speed to finish caries removal.
Achieve haemostasis with gauze (5% sodium hypochlorite pellet is one option) at the exposure site.
MTA or Biodentine placed directly at the exposed pulp.
Vitrebond (RMGIC) to cover the pulpal floor and axial walls, LC 20s.
Matrix system if proximal.
Etch + bond.
Bulk-fill or layering composite build-up.
Check occlusion/contact, finish and polish, POIG.
If restoring two adjacent teeth in the same visit (e.g. 15 and 16): use two matrix bands to fit each tooth and create a contact, with one wedge/ring towards the mesial. Complete one tooth fully (etch, bond, restore, finish, polish) before removing its matrix and starting the next, rather than trying to manage both matrices at once.
Pulpotomy
Definition: removal of the inflamed/infected coronal pulp (deep caries) while preserving the vital radicular pulp, followed by a medicament to fix/mummify or stimulate healing of the remaining pulp.
Why it matters in paeds: maintains vitality until exfoliation, prevents premature loss (→ malocclusion), avoids extraction in children where surgery is higher risk (bleeding disorders, congenital heart disease), preserves arch length/function.
Mild pain expected → paracetamol/ibuprofen if needed
Eating
None until numbness wears off → soft diet today
Lip care
Avoid biting lip/cheek → supervise child
Restoration
Avoid hard/sticky foods, especially with a new SSC
Follow-up
~6 months
Return early if
Pain >2–3 days, swelling, abscess, fever
Occlusal adjustment (opposing SSC)
2–3 weeks
LA regions for pulpotomy
Arch
Region
Technique
Notes
Upper
Anterior/Posterior
Buccal infiltration (ASA/PSA)
Usually sufficient
All teeth
Palatal infiltration
Essential for pulpotomy
Lower
Posterior
IANB
Primary method
Buccal gingiva (molars)
Long buccal block
For soft tissue
SSC cementation material choice (post-pulpotomy)
Material
Indication
Advantages
Caveat
GCem (self-adhesive resin)
Permanent crowns / extra retention needed
Very high bond strength, low solubility, good aesthetics
Technique-sensitive, hard cleanup in kids, no fluoride
Fuji Plus (RMGIC)
Gold standard for paeds SSC
Strong bond to tooth+metal, fluoride release, moisture tolerant, easy handling
Slightly more expensive
Key takeaways: pulpotomy removes coronal pulp but preserves radicular pulp · indicated for asymptomatic/reversibly-inflamed pulp with no infection · haemostasis is critical (excessive bleeding suggests deeper inflammation) · SSC placement afterwards is preferred for long-term success · contraindicated with spontaneous pain, infection, or poor prognosis.
Recurring critical errors: occlusal reduction under 1mm (must clearly be lower than the adjacent tooth, >1mm); not comparing box/proximal reduction against a wedge/perio-probe width check for ledges; forgetting to cut the rubber dam before crown try-in.
Stainless Steel Crowns (SSC) / Hall Technique
Indications
Multi-surface caries
Moderate–deep caries (no irreversible pulpitis)
High caries risk child / poor cooperation
≥2 years before expected exfoliation
Need long-term durability
Contraindications
Signs of pulpal pathology
Non-restorable tooth
Advanced root resorption
Exfoliation expected <2 years
SSC on an E while the underlying 6 is unerupted (impaction risk) — confirm the 6 is fully erupted first
Advantages / disadvantages
Advantages: very high success rate, no LA/drilling (Hall technique), seals and arrests caries progression, durable until exfoliation. Disadvantages: metal appearance, temporary bite raising, mild initial discomfort.
Undiagnosed pulp pathology may still deteriorate under the crown
POIG
Avoid sticky food 24h (same for separator placement)
Avoid normal/soft food for 1h
Bite may feel different — normal
Return if pain/swelling
Brush carefully while separators are in
Size selection & seating
Try from the middle size (size 4) and go up/down.
Seat from lingual to buccal. If it feels like it wants to tip in / bounce, try a different size.
If one size is too small but the next is a bit wobbly, you can crimp the margin inward on a flat surface to make it more snug, then re-try.
Most important safety step — always cover the throat with gauze throughout crown try-in/cementation to prevent swallowing/aspiration; never leave a loose (uncemented) crown unsupported in the mouth — keep pressing it while waiting for the CE, or remove it.
Cement material choice
Material
Cure
Indication
Notes
GCem (self-adhesive resin)
Light-cure (can skip LC for more working time)
Poor compliance / need more operating time
No fluoride release
Fuji Plus (RMGIC luting)
Self-cure (acid-base)
First choice for paeds SSC
Fluoride release, easy handling, quicker
Fuji VII (conventional GIC)
—
NOT for SSC cementation
Too weak mechanically — preventive use only
Seating & cementation steps
Remove separators
Gauze throat protection
Try sizes, choose best fit
Cement (Fuji Plus / GCem)
Seat lingual→buccal, press all the way down; check occlusion
Patient bites cotton roll tightly for 2 minutes (support their chin closed)
Remove all excess cement with gauze/floss/explorer — check every surface; ultrasonic scaler is useful interproximally; never use polishing strips around a crown margin
Recheck occlusion
Wait 4–6 weeks before seating/adjusting an opposing crown (allows initial settling).
SSC competency checklist
✓ Explain risks and POIG to parent/carer
✓ Know occlusal adjustment timing for an opposing SSC (4–6 weeks)
✓ Gauze throat protection in place throughout
✓ Correct crown size selection
✓ Correct cement material selection + cementation
✓ Correct seating direction (lingual→buccal), fully pushed down
✓ Patient bites cotton rolls tightly for 2 minutes
✓ All excess cement fully removed
✓ Occlusion checked
If an SSC is impacting an erupting tooth, remove it and re-cement once the impacted tooth has fully erupted.
Paeds communication scripts
Explanation
To child (SSC)
"We place a silver cap over the tooth to trap the sugar bugs so the tooth can stay healthy."
To parent (SSC)
"The crown is placed without removing all the decay. Sealing the bacteria in prevents further damage." (Hall technique)
To child (cement)
"We use a special tooth glue to help the crown stay on your tooth."
To parent (cement)
"We place a dental cement inside the crown (e.g. G-CEM or Fuji PLUS) to bond the crown to the tooth and seal the space between crown and tooth."
Extraction / Oral Surgery
Indications
Non-restorable tooth
Abscess/sinus tract
Irreversible pulpitis
Advanced root resorption
Contraindications
Child unable to tolerate the procedure
High space-loss risk without a planned space maintainer
Advantages: removes infection source, definitive treatment, no restoration-failure risk. Disadvantages: space-loss risk, may need space maintainer, more traumatic.
Risks
Prolonged pain/bleeding
Infection → abscess or delayed healing
Space loss without a maintainer
Dry socket (exposed bone/nerve)
Nerve injury → lip/cheek numbness
Damage to adjacent teeth/soft tissue, alveolar bone or socket fracture
POIG
Bite on gauze 30 minutes for clotting
Ice pack outside the cheek, 10–20 min intervals, first 24h (swelling)
Rest: head elevated, avoid strenuous activity 24–48h
Soft diet, avoid hot food 24h, chew opposite side
No rinsing/spitting/straw for 24h (risk of dislodging the clot)
LA for extraction
Site
Upper
Lower
Anterior teeth
ASA infiltration + Nasopalatine
IAN block
Premolars
MSA + Greater palatine
IAN block
Molars
PSA + Greater palatine
IAN + Long buccal
Grade >3 mobility (primary)
Buccal + lingual/palatal alveolar infiltration only — no block needed
Recurring points from feedback:
Take a PA before extraction (root morphology/resorption, pathology, confirm tooth + successor position).
Apply proper apical drive — will feel "spongy" once achieved.
Buccal abscess: articaine is a better buccal-infiltration choice than lidocaine.
Systemic facial swelling/fever → antibiotics needed and IAN block is contraindicated until resolved; once swelling is confined intra-orally, proceed with LA + extraction.
Orthodontic extraction of 8s: if patient >17y, probe distal pocket depth of the 7 — >4mm indicates extraction of the 8.
Positioning & technique
Patient nearly upright. Clinician position: Q1/Q2/Q3 → 7 o'clock; Q4 → 11 o'clock (standing). For a right-handed clinician doing an upper-right anterior extraction, ~8–9 o'clock.
Lower anterior — conform to facial/lingual contour
Lower molars — both beaks pointed, fit root bifurcation
Paedodontic forceps are smaller/easier to conceal — reduces anxiety
Grade-3-mobile primary tooth: use the correct small forceps (e.g. premolar forceps for a mobile primary molar) — an IAN block is not appropriate here; buccal + palatal/lingual alveolar infiltration alone is enough.
My Case — Primary Tooth Extraction
MY CASE Extracting a mobile primary anterior tooth as part of planned orthodontic space management reinforced a few points beyond the standard steps: for a right-handed clinician doing an upper-right anterior extraction, position at roughly 8–9 o'clock rather than the usual 7 o'clock. The supporting (non-dominant) hand does three jobs at once — supports the alveolar bone, retracts soft tissue, and gives tactile feedback. Seat the forceps as apically as possible and apply gentle apical pressure before starting luxation, then use slow, controlled buccal–palatal movements (rotate, hold, rotate a little further each time) rather than rapid or forceful movement. Pearl Consciously check whether it's the tooth that's moving or just the forceps flexing/slipping on the crown — it's easy early on to mistake forceps movement for tooth mobility and apply more force than is actually needed. A PA beforehand is essential every time, not just for difficult cases — root morphology/resorption, unexpected pathology, and confirming the correct tooth (and successor position, if relevant) can all change the plan.
Local Anaesthesia
Equipment per treatment type
Procedure
Numb needed
Nerves
Clean/scale
Palatal + pulp + buccal
Upper: PSA/MSA/ASA (± palatal infil). Lower: IAN + lingual (± long buccal)
Restore
Pulp only
Upper: PSA/MSA/ASA. Lower: IAN (buccal infiltration alone may suffice with articaine — IAN covers the pulp; long buccal/lingual only matters for extraction)
Infiltration needle = 30G short; Block needle = 27G long. Check expiry of both needle and cartridge.
Assembly: twist the needle on by hand (only step where fingers touch the needle) → twist ring out → pull plunger out → open body → insert cartridge → close body → twist ring in → push plunger in gently, engage harpoon into the bung.
Disassembly: pull plunger out slowly → open body → drop cartridge out → close body → use forceps to twist the needle shield off → into the sharps box.
Sharps disposal: keep fingers entirely outside/under the edge of the sharps box, drop needle+cartridge in.
Engaging the bung: needle pointing down, two quick smacks with the heel of the palm, then gently pull back slightly to confirm it's fully engaged — you cannot aspirate if the bung isn't engaged.
Buccal / Palatal infiltration
Buccal
Palatal
Needle
30G short
30G short
Landmark
Midline of tooth, junction of attached gingiva & mucosa
Junction of attached gingiva & palate, midline
Angle
Bevel faces bone; nearly parallel/straight to root long axis
Bevel faces bone; ~45° from palatal surface
Depth / volume
3–5mm tip in, 0.5–1mL (¼–½ cartridge)
1–2mm tip in, few drops (0.1–0.3mL)
Articaine is preferred for a strong buccal infiltration — better bone penetration than lignocaine, especially useful since children's mandibular bone is thinner; buccal articaine infiltration can substitute for an IAN block for primary molars (supported by AAPD/EAPD guidance).
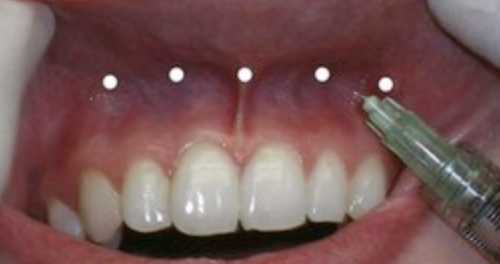
Buccal infiltration — midline of the tooth, at the junction of attached gingiva and mucosa
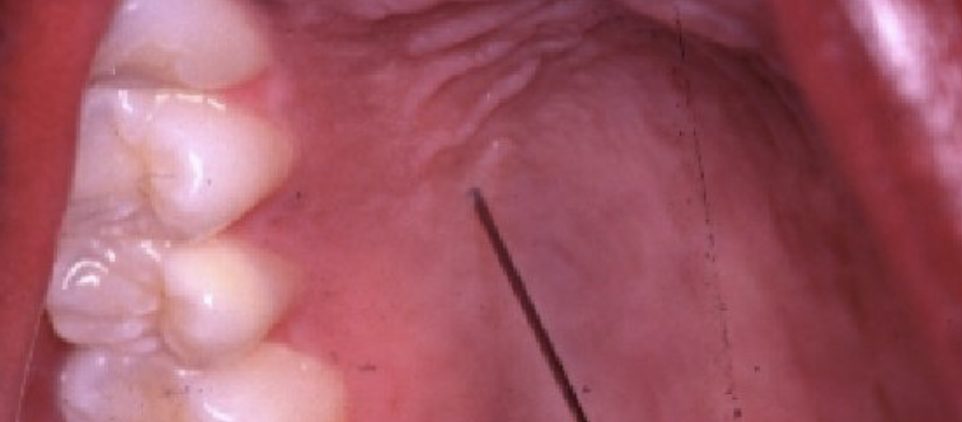
Palatal infiltration — junction of attached gingiva and palate, needle ~45° off the palatal surface
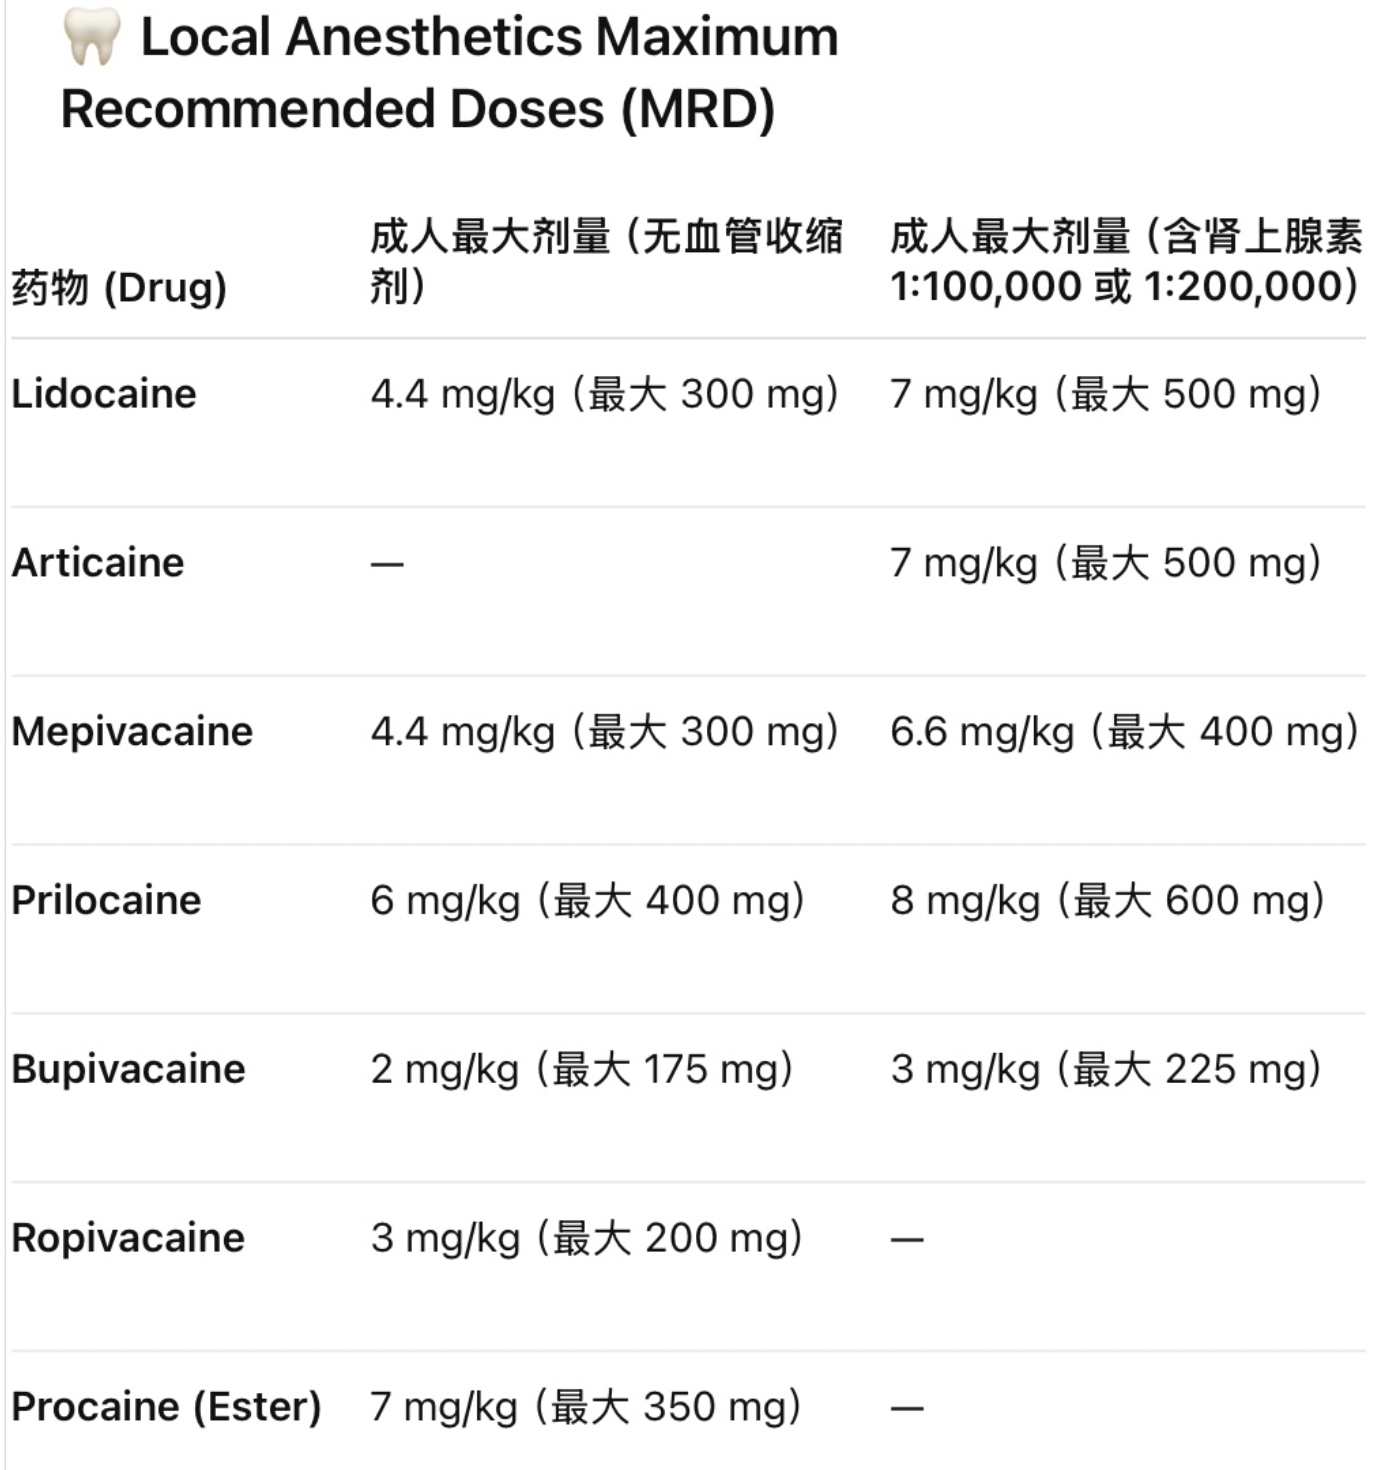
Local anaesthetic maximum recommended doses (MRD) by drug, with/without vasoconstrictor
IAN Block
27G long needle; check expiry.
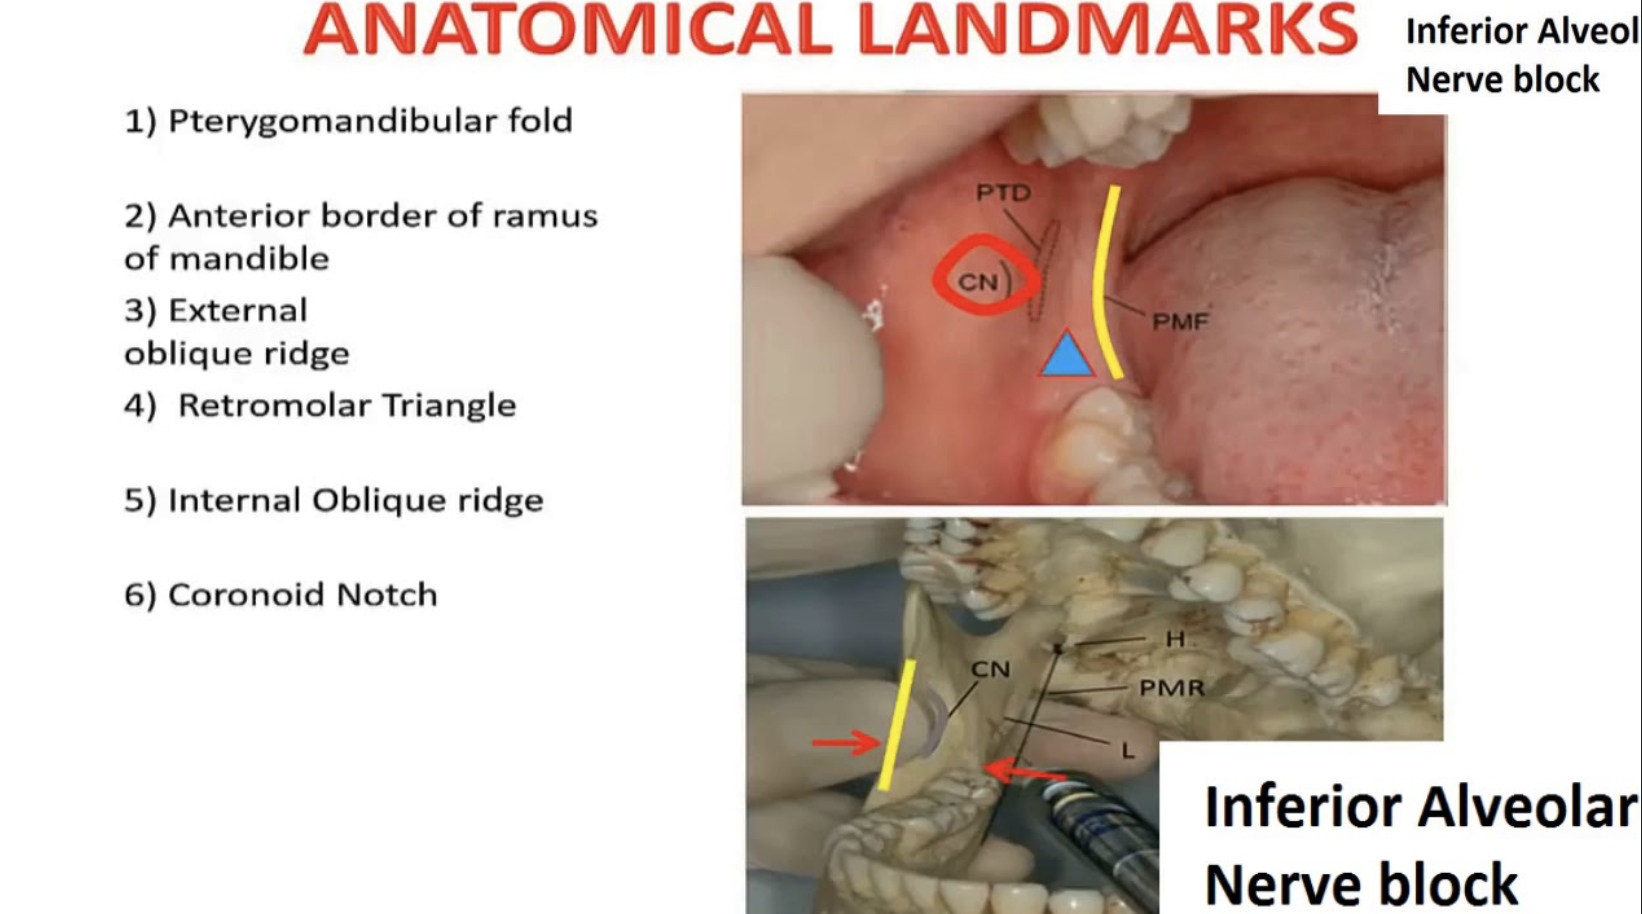
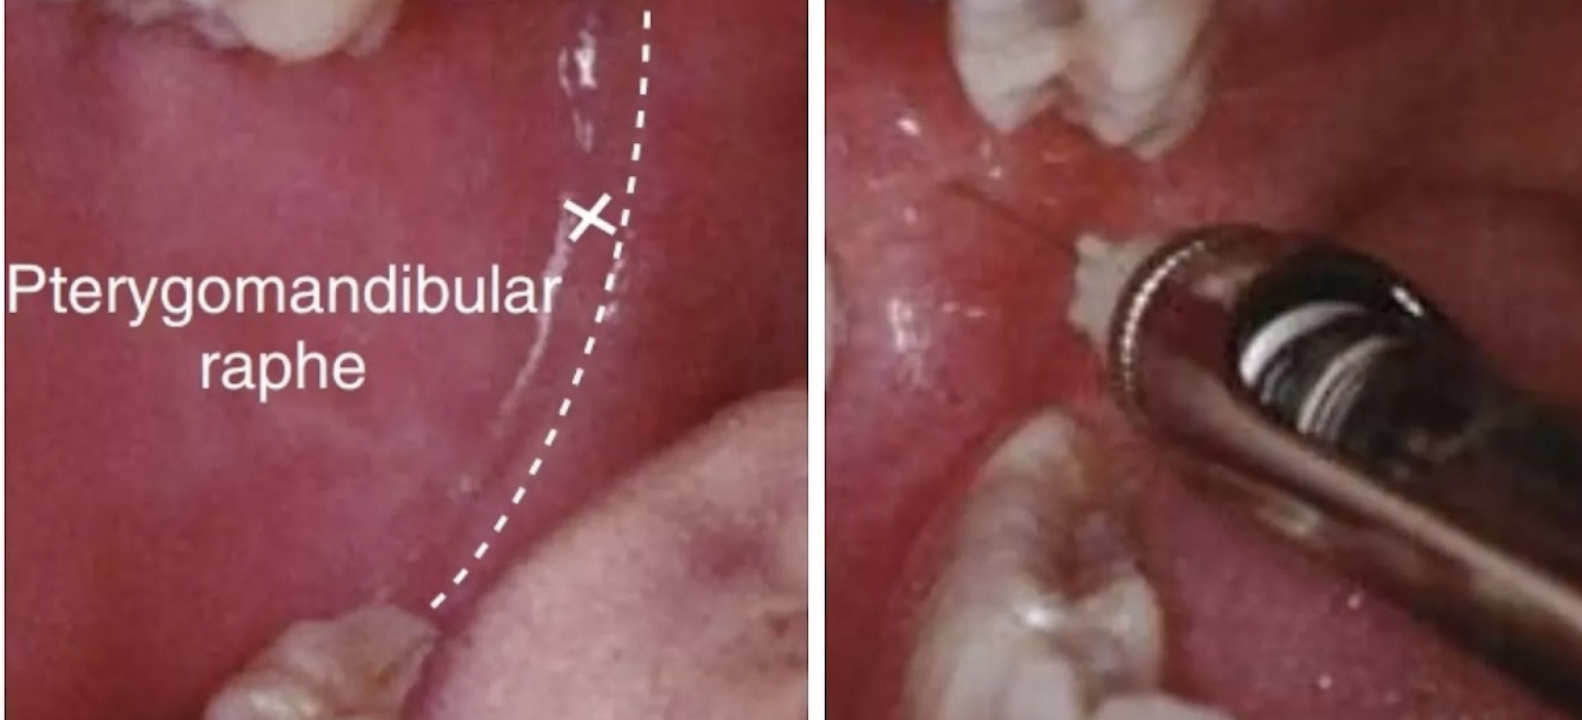
Palpate first: coronoid notch + posterior border of ramus, then identify pterygomandibular raphe & pterygotemporal depression. The raphe sits posterior to the disto-lingual cusp of the last molar.
Topical anaesthetic 2 minutes; retract cheek tightly with a mirror.
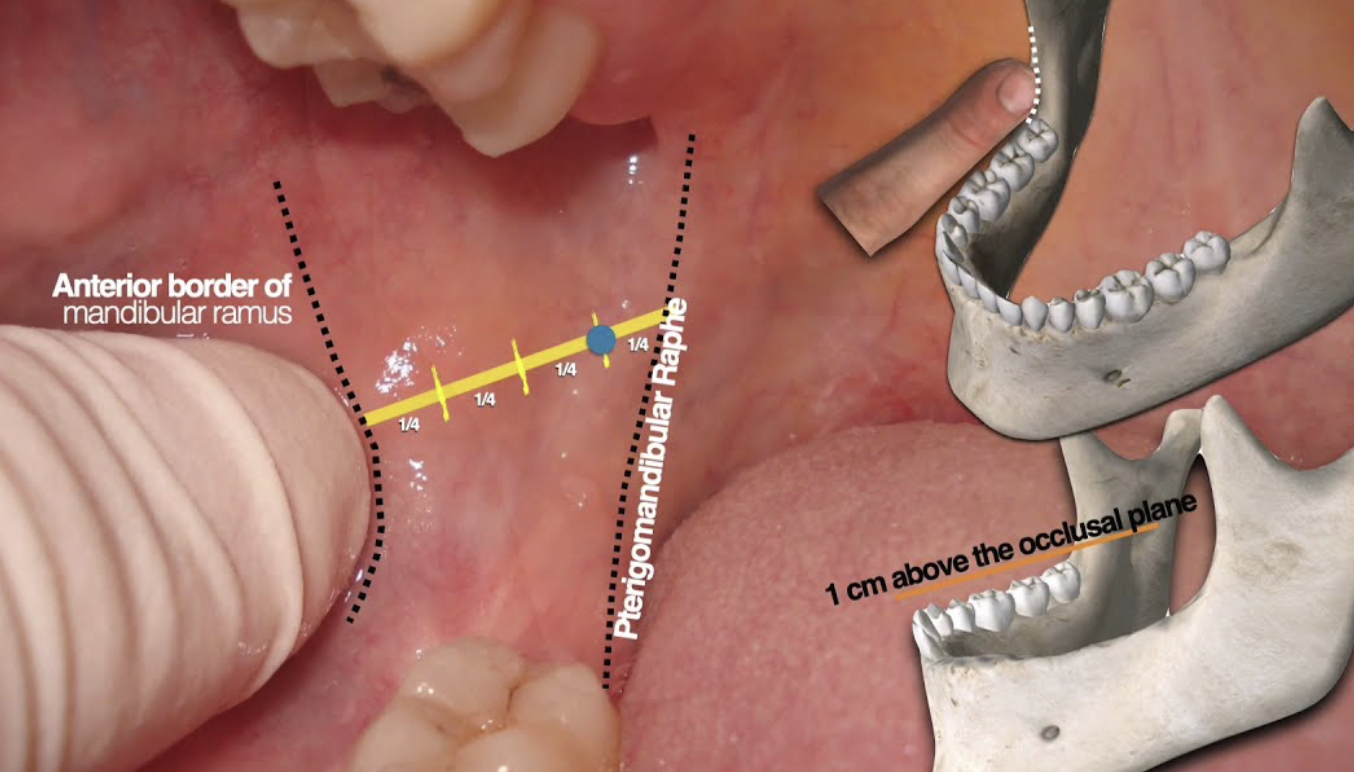
Bevel faces bone. Horizontal angulation: above, between the contralateral premolars (slightly closer to the 1st premolar). Vertical angulation: parallel to occlusal plane, ~1.5cm above it.
Must stay lateral to the raphe — check twice before inserting, especially on the left side.
Advance ~2/3–3/4 of the needle until bone contact, aspirate (no blood), inject ~1.5mL slowly.
Withdraw ~10mm, contact the lingual nerve, aspirate again, inject the remainder, withdraw, sheathe.
Too shallow (touches bone early) → withdraw and angle slightly more medially. Too deep (no bone contact) → withdraw and angle slightly more labially.
Pterygomandibular raphe — the injection point sits lateral to this fold
Horizontal insertion point (quarter-marks along the raphe) and the "~1cm above occlusal plane" vertical landmark
Overall needle trajectory for an IAN block, schematic view
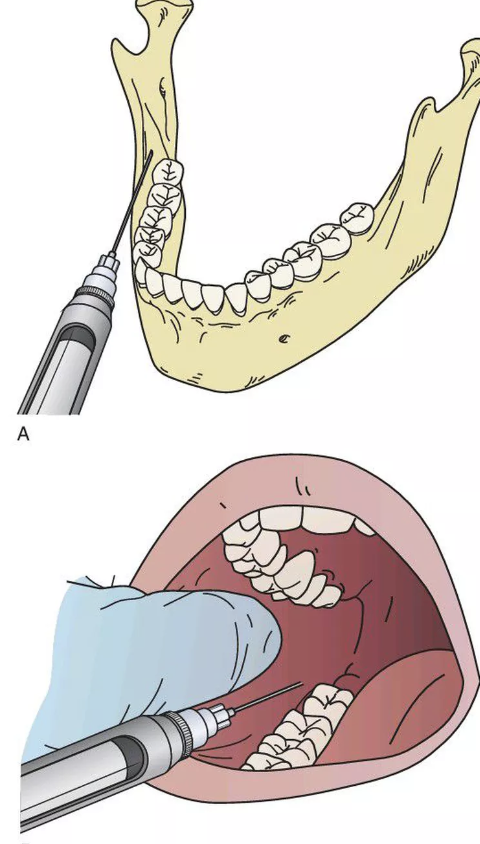
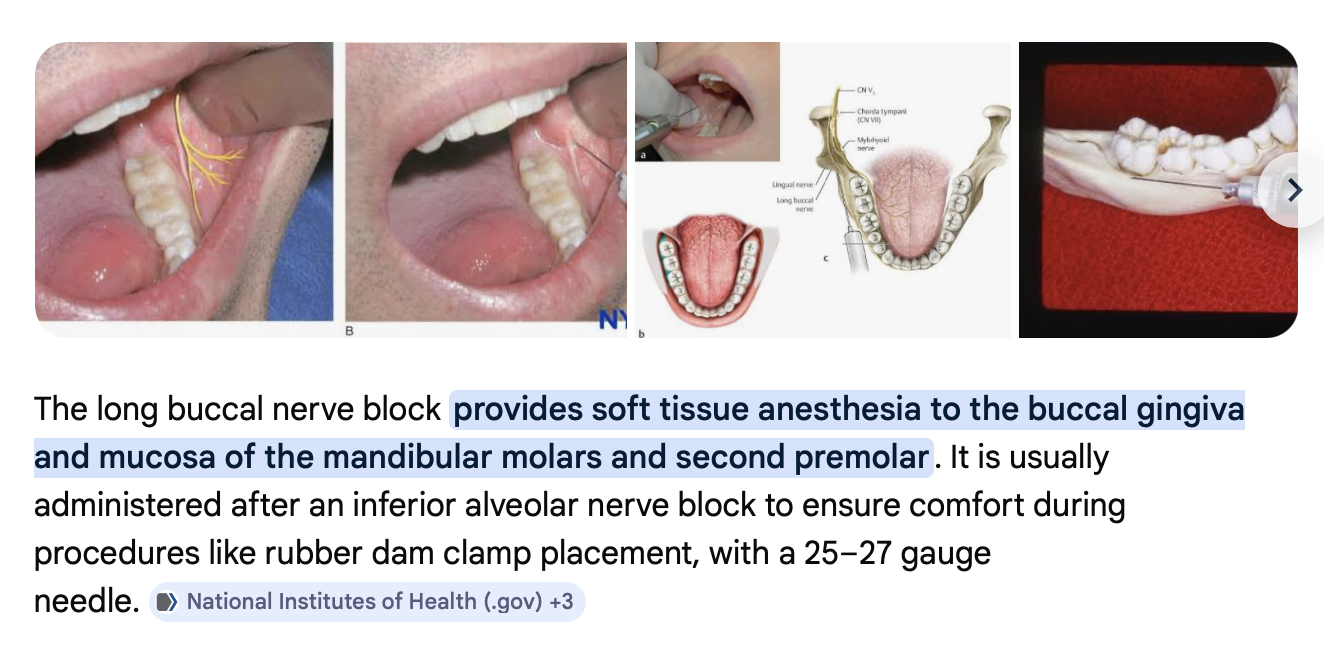
Long Buccal Block
Palpate the internal oblique ridge; inject distal & buccal to the most posterior mandibular molar, at occlusal plane height, parallel to the dentition. Insert only 2–4mm, 0.2–0.3mL. Seat at 7 o'clock for Q4.
Long buccal block — provides soft tissue anaesthesia to buccal gingiva/mucosa of the mandibular molars and 2nd premolar; usually given after the IAN block
Risks & facial nerve paralysis
Pain/discomfort at injection site
Bruising/haematoma
Trismus
Prolonged numbness/paraesthesia of lip or tongue
Temporary facial nerve paralysis if anaesthetic reaches the parotid gland during IAN block (rare)
Allergic reaction (rare)
Explaining facial paralysis to a patient: "Sometimes the anaesthetic can temporarily affect the nerve that controls the muscles of your face if it spreads near the parotid gland. You may notice your eye doesn't close fully, the corner of your mouth feels droopy, or your face feels weak/uneven when you smile. This is temporary and wears off within a few hours as the anaesthetic disappears. Because your eye may not close completely, try to blink regularly — we may place eye protection if needed."
POIG (LA)
Do not bite lip/cheek/tongue while numb
Avoid hot food/drinks until sensation returns (numbness usually 2–4h, children ~1–2h)
If facial weakness occurs, it resolves as anaesthetic wears off; protect the eye if needed
Contact the clinic if numbness persists longer than expected, or swelling/pain/trismus develops
Scenario → nerve selection
Scenario
Maxillary
Mandibular
Notes
Supragingival scaling
Usually none
Usually none
Unless sensitive/anxious
Subgingival clean (SRD)
Infiltration (site-specific)
IAN block (± long buccal for molars)
If deep pockets/pain
Restoration Class I–V
Infiltration
IAN (posterior) or infiltration (anterior)
Mandibular molars → IAN essential
Deep restoration (near pulp)
Infiltration + consider palatal (if clamp)
IAN block
More profound anaesthesia needed
RD clamp discomfort
+ Greater palatine/Nasopalatine
Usually IAN sufficient
Palatal pain common
Pulpotomy/Pulpectomy
Infiltration (± palatal)
IAN (may need supplementary)
Inflamed pulp harder to anaesthetise
Extraction – anterior
ASA + Nasopalatine
IAN block
Always include palatal in maxilla
Extraction – premolars
MSA + Greater palatine
IAN block
Extraction – molars
PSA + Greater palatine
IAN + Long buccal
GIC/ART restoration
Often none
Often none
Minimally invasive
Paeds communication (LA)
To child
"We will give the tooth sleepy medicine so it can take a nap while we fix it."
To parent
"Local anaesthetic numbs the tooth so the procedure is comfortable."
Advice
Numbness usually lasts 1–2 hours; avoid biting the lip during that time.
Recurring feedback points: unsafe/non-ergonomic syringe grip; injecting into the mucobuccal fold vs attached gingiva (too high/too mesial is a common miss); reviewing the exact anatomical insertion point for palatal infiltration; injecting too fast (should always be slow, and talk the patient through it — avoid saying the word "needle" to children); requesting to attempt a competency for a technique that isn't clinically indicated for that case (e.g. IAN block for a mobile primary tooth) shows a gap in understanding, not just execution.
My Case — IAN Block Troubleshooting
MY CASE During an IAN block attempt, aspiration wasn't working — the cause was the harpoon/bung not being fully engaged into the cartridge stopper. Lesson: after the two quick smacks to engage the bung, actually confirm a small amount of anaesthetic appears at the needle tip before proceeding, and check for resistance before injecting — you can't aspirate (and therefore can't confirm you're not in a vessel) if the bung isn't properly seated. For the Long Buccal block specifically: seat at 7 o'clock for Q4, palpate the internal oblique ridge and coronoid notch, aim just postero-lateral to the last molar at occlusal-plane height and parallel to the dentition, and insert only 1–3mm — it's a very shallow, small-volume injection (~0.2mL), and it's easy to instinctively go too deep out of habit from the IAN block.
Periodontal & Radiography
Perio charting
A complete perio chart needs pocket depths + mobility + furcation + suppuration + bleeding. You legally can't charge a full periodontal exam item, or accurately stage/grade, without all of these.
Suppuration vs plaque: pus is a yellowish/whitish, watery, continually-flowing discharge around the gum margin with a transparent, swollen gingival margin. Plaque is more solid and comes away more easily with the probe. Don't confuse topical anaesthetic gel residue with pus either.
Severe generalised perio tends to show many Grade 1 mobilities with several Grade 2/3s, rather than a single mobile tooth.
Watch posture — keep elbows down, don't sit/stand too high relative to the patient (long-term ergonomic risk).
Official periodontitis staging reference (2017 World Workshop classification) — interdental CAL, RBL, tooth loss and complexity factors by stage
Official periodontitis grading reference — Grade A/B/C, rate of progression and risk factors (used alongside staging above)
Scaling / Prophylaxis
Stubborn stains: prophy paste mixed with pumice works better; an Airflow machine is more effective still. If stains persist, switch to ultrasonic + hand scaling and be patient.
After disclosing gel + scaling, use ultrasonic only to clear gel near the gumline/interproximally, then switch to the prophy cup for the bulk surface area (faster than trying to chase every trace with the ultrasonic tip).
Prophy cup technique: light, controlled pressure, reposition regularly, adapt around contours/gingival margins — excess pressure wears through cups and risks soft tissue trauma.
Orthodontic patients: use the ultrasonic tip's side (not the point) around brackets/wires, small overlapping strokes, dry and reassess frequently; use hand instruments where access is limited.
Radiography
ADDED Approximate effective radiation doses, for context when explaining ALARA to a patient/parent (supplementary reference, not part of the original placement notes) — figures are typical ranges and vary by machine/settings:
Exam
Approx. effective dose
≈ Equivalent to
1 Periapical (PA), digital
~0.001–0.005 mSv
A few hours of natural background radiation
Bitewings (set of 2), digital
~0.002–0.008 mSv
Less than a day of background radiation
OPG (panoramic)
~0.01–0.03 mSv
A few days of background radiation
Average daily background radiation
~0.007–0.01 mSv/day
—
Dental radiography doses are very low compared to medical imaging (e.g. a chest CT is roughly 1000× a single PA) — useful framing for anxious patients/parents, without ever suggesting radiographs are "harmless" or routine.
OPG
Explain to patient/parent, gain consent
Remove metal items
Set correct exposure dose; bite block with plastic cover; insert chin + bite block; adjust machine height before the patient steps in
Patient grips the hand holder, stands still, bites the block, wraps lips around it firmly
Adjust head holder; align the vertical red line with the posterior of the upper canines (patient smiling); align the horizontal red line at the bottom of the eye sockets
Hold the exposure button until the beep
Recurring competency feedback: avoid slouched posture, ensure the chin is correctly seated on the chin rest, avoid raising the chin excessively, watch the horizontal line height (too low is a common miss). Document findings in this order: purpose of the OPG → normal findings (e.g. all permanent teeth present) → bone level → abnormal findings (radiolucencies/opacities, missing/rotated/supernumerary teeth) → recommended next steps.
Communication: to a child — "We're going to take a special picture of your teeth, it doesn't hurt, you'll stand very still while the machine slowly goes around your head like a big smile photo." To a parent — "A panoramic X-ray showing how the adult teeth are developing, whether they're coming in correctly, and whether any are missing, extra or impacted. The dose is very low and only taken when clinically necessary, following ALARA."
Bitewing (BW)
Patient/dentition
Size
Notes
Small child, primary dentition
Size 0
Small mouth, limited opening
Child, mixed dentition
Size 1
Posterior coverage, comfort
Adult / larger child (e.g. 7s erupting)
Size 2 (standard)
Prefer BW holder over a bite block for accurate cone angulation
Adult, wide arch
Size 3
Horizontal long BW (rare)
Holder priority: accuracy/reproducibility (older child) → BW holder; comfort/speed (younger child) → bite tab; digital sensor/infection control → paper tab; gag reflex → bite/paper tab.
Recurring errors: saving an X-ray into the wrong patient's file (a reportable breach — always double check the name first); angulation too posterior/too high causing cone-cut — angle by hand to fully cover the film and stay perpendicular; using bite-block-only for a size-2 film is hard to angle correctly, prefer the BW holder.
Ortho patients — use ALAHRA reasoning to decide if a BW update is due: caries risk/history, demineralisation, OH/plaque around brackets, diagnostic value with appliances present, time since previous films. Low-risk permanent dentition → update every 18–24 months even in a child.
BW reading trap A triangular dentine shadow close to the mesio-occlusal (MO) line angle can mimic ICDAS/BW code 4 caries on a bitewing without true caries being present — don't commit to a code 4 diagnosis from the radiograph alone; correlate with clinical findings first.
Working out which side is which: the mandible isn't always positioned more forward than the maxilla, so don't assume orientation by default — check the OPG first to see the relative anteroposterior position of the maxilla and mandible on each side, then use that to determine which arch is upper and which is lower on the bitewing. As a general rule, only the maxillary canine is typically captured on a standard bitewing, which can also help confirm orientation. Pearl
Periapical (PA)
Always take a PA before an extraction. Choose the correct holder (posterior vs anterior colour-coded); set exposure dose and arm position before starting; the cone's midline must be parallel to the floor or you'll get elongation. Upper anteriors: size 2 film, patient closes lips, cone faces the film.
My Case — Worked Perio Staging
MY CASE A comprehensive periodontal exam on an adult patient found more than 5 sites with significant attachment loss, several teeth with Grade 3 mobility, and severe bone loss confirmed on a prior OPG — staged as Stage IV, Grade C. This was a good reminder that a full periodontal exam is not legally complete (or billable), and can't be accurately staged/graded at all, without recording mobility alongside pocket depths, furcation, suppuration and bleeding — missing just one of these was flagged as an incomplete exam. Treatment was then sequenced by quadrant/half-mouth with the appropriate LA for each visit (never plan an upper arch and a lower arch together in one appointment if that would need two separate blocks — poorly tolerated and hard to justify on time), followed by a 6-week review and then a 3-month review after the final subgingival appointment, before referring the restorative component onward.
MY CASE Practical radiography habits worth carrying forward: the yellow (non-ring) BW holder works well; for a patient with very few remaining teeth in an arch, have them bite the one remaining tooth down onto a cotton roll first to stabilise it, then place the film, rather than relying on the holder's bite-block alone. For PAs, the holder is colour-coded — yellow = posterior, blue = anterior — and the exposure dose and arm position should be set and double-checked before starting, since the cone's midline must stay parallel to the floor or the image elongates. For stubborn extrinsic staining that won't lift with a standard prophy paste, a pumice-mixed paste (or an Airflow machine, if available) is more effective than pressing harder with the cup.
Communication & Behaviour Management
Full child/parent communication scripts, organised by treatment stage:
Behaviour mgmt & communication
Technique
To child
To parent
Tell–Show–Do
"First I will tell you what we are going to do. Then I will show you the tool. Then we will do it together."
Helps children understand each step before it happens, usually reducing fear and improving cooperation.
Positive reinforcement
"You are doing a great job keeping your mouth open. Thank you for helping me."
Encouragement when they cooperate builds confidence and reduces anxiety.
Anxious children
"If you need a break, just raise your hand and we can stop for a moment."
Letting children signal for a break helps them feel more in control.
Exam & diagnosis scripts
Topic
To child
To parent
Exam
"We are going to count your teeth and check how strong they are."
Checking teeth, gums and mouth for cavities and normal development.
X-rays
"We will take a special picture of your teeth."
X-rays show between teeth and inside the tooth where a normal exam can't see. Radiation is very low, protective shields are used.
Caries risk
"Sugar bugs can make holes in teeth if they stay there too long."
Cavities develop when bacteria stay on teeth and are frequently fed sugar; assess diet, brushing, previous cavities.
Eruption monitoring
"Your grown-up teeth will come when the baby teeth are ready to fall out."
We monitor how adult teeth erupt to confirm normal progress.
Preventive treatment scripts
Topic
To child
To parent
OHI
"Brush all sides of the teeth so the sugar bugs cannot stay on them."
Brushing 2×/day with fluoride toothpaste is the most effective prevention.
Diet
"Sugary snacks should be special treats instead of something we eat all day."
"We will paint vitamins on your teeth to make them stronger."
Strengthens the outer tooth layer. Aftercare: avoid brushing that day, avoid hard food for several hours.
Fissure sealant
"We will paint a shield into the grooves of the tooth so sugar bugs cannot hide there."
Deep grooves are hard to clean; sealant covers them to help prevent decay.
SDF
"We will paint a special medicine on the tooth to stop the sugar bugs from making the hole bigger."
Stops the cavity growing without drilling. Contains silver (antibacterial) and fluoride. The area turns dark because the cavity has stopped growing.
Restorative & surgical scripts
Topic
To child
To parent
Moisture control (RD/dry guard)
"We place a little raincoat around the tooth to keep it dry."
Helps the filling stick properly and improves success.
GIC filling
"We clean the sugar bugs and put a strong filling to fix the tooth."
Repairs the tooth and releases minerals that protect against future cavities.
Pulpotomy
"The inside of the tooth is a bit sick, so we clean the inside to help it feel better."
The infected part is removed while keeping the healthy part, so the tooth can stay in place. Usually protected afterwards with a crown.
Extraction
"This tooth is too sick to fix, so we will help the tooth wiggle out."
The tooth can't be repaired, so removal prevents infection and pain.
Post-extraction
"Bite on the soft cotton to help the tooth stop bleeding."
Bite on gauze ~30 minutes; avoid hot food or rinsing for the rest of the day.
Space maintainer
"We place a small helper to keep the space for the new tooth."
When a baby tooth is lost early, this keeps the space open for the adult tooth.
Developmental / trauma scripts
Topic
To child
To parent
MIH
"Some teeth are born a little softer than others, so we help protect them."
Weaker enamel can be more sensitive/likely to break down. May need fluoride, sealants or fillings.
Chipped tooth
"A small piece of the tooth has broken, so we will smooth or fix it."
Minor fractures usually repaired with a small filling or smoothing.
Avulsion
"The tooth came out after the fall, and we will help take care of the area."
Immediate care is important — sometimes the tooth can be replaced quickly.
Thumb sucking
"Thumbs are for helping hands, not for teeth."
Can affect tooth/jaw development if prolonged — gradual habit-reduction is usual approach.
Enamel hypoplasia
"Part of the tooth didn't grow as strong as the rest, so we help protect it."
The outer layer of the tooth didn't form completely during development — monitoring, protective coatings, or fillings may be recommended.
Loose tooth after trauma
"The tooth is a little wobbly because it had a bump."
The tooth may loosen after an injury — we monitor healing and check the nerve and surrounding tissues recover normally.
Mouth breathing
"Breathing through the nose helps keep the mouth healthy."
Long-term mouth breathing can affect oral health and jaw development — may recommend medical assessment if needed.
Crowding / ortho referral
"Your teeth may need a little help to grow in the right place."
If the teeth don't have enough space to grow properly, an orthodontic assessment may be recommended.
Preventive Resin Restoration (PRR)
"We will clean a tiny spot and place a small filling to protect the tooth."
A small early cavity is cleaned and sealed with a filling combined with a sealant to stop further decay.
Professionalism pearls
Age-appropriate questioning — asking a young child directly about alcohol/drug/smoking use is not clinically appropriate without context and can concern parents; match your medical-history phrasing to the patient's age and situation.
Professional demeanour — keep a consistent professional tone during medical history discussions even when parents are chatty/joking; excessive laughing during a medical interview undermines it.
Interpreters — if there's any doubt a parent/patient fully understands, arrange an interpreter even if they say they don't need one; record the interpreter's name and staff/registration number in the notes.
Consent language — write consent and treatment explanations in plain layman's terms the parent can understand, not jargon (e.g. "filling on the upper left baby molar under local anaesthetic" rather than tooth numbers/abbreviations only).
Medical history follow-through — a positive history isn't the end of the question. Epilepsy → ask about seizure types, frequency, known triggers, last seizure, medication. Autism → ask level, and how it affects appointment tolerance. Asthma → ask about triggers, symptoms, and which puffer (colour) plus how often it's used.
Documentation as a medico-legal record — treatment notes must accurately reflect what was discussed, examined, found, and planned — including advice given to the parent and the reasoning behind treatment choices, since these are legal documents.
Infection control zones — a sterile packet that touches a tray holding instruments already used in the mouth is now considered contaminated, even if untouched — don't then move it to a "clean" zone.
Professional presentation — follow the clinic's dress/footwear policy; hair caps must fully contain hair/fringes.
My Case — Behaviour Management Tip
MY CASE For a patient with ADHD who struggled to stay still/focused during examination, letting them hold the mirror themselves so they could watch what was happening in their own mouth noticeably helped them concentrate and cooperate — a simple, low-cost behaviour management tool worth trying for patients who engage better visually/actively than through passive reassurance alone. Also worth building into medical-history questions rather than stopping at "yes/no": if a patient discloses recreational drug use, gently ask what type(s) if they're willing to share, since this can affect LA/sedation planning and interactions — a positive answer shouldn't be left unexplored just because it feels like a sensitive topic.
Cross-Procedure Comparison Module
The same four questions come up for every treatment-planning decision and every informed-consent conversation: 1) Indications/contraindications 2) Advantages/disadvantages 3) Risks 4) Post-op instructions (POIG). Below, related decisions are laid out side-by-side for revision as a set, rather than split across separate procedure sections.
SSC vs GIC restoration
Factor
SSC – Hall
GIC Restoration
Indications
Multi-surface caries; moderate–deep (no irreversible pulpitis); high caries risk/poor cooperation; ≥2y to exfoliation; need durability
Small–moderate lesions; cooperative child; low–moderate risk; interim restoration; tooth close to exfoliation
Contraindications
Pulpal pathology; non-restorable; advanced resorption; exfoliation <2y; don't place on an E if the underlying 6 is unerupted
Extensive multi-surface caries; heavy occlusal load; high caries risk; poor moisture control
Advantages
Very high success; no LA/drilling; arrests caries; durable to exfoliation
Maintains tooth & space; less psychological trauma
Definitive; removes infection fully
Disadvantages
Possible failure; needs crown coverage
May need space maintainer
Risks
Internal resorption; failure → extraction later
Bleeding, infection
POIG
Mild soreness
Standard extraction instructions
SDF vs Hall-technique SSC
Factor
SDF
Hall SSC
Indications
High caries risk; poor cooperation; early–moderate cavitated lesion; tooth near exfoliation
Multi-surface lesion; ≥2y to exfoliation; need durability
Contraindications
Aesthetic concern (black staining)
Pulp pathology
Advantages
Non-invasive; no LA; quick
High long-term success; seals lesion
Disadvantages
Black staining; needs reapplication
Metal crown aesthetic
Risks
Soft tissue staining
Bite discomfort initially
POIG
Avoid eating 30 min
Avoid sticky food 24h
Space maintainer vs monitor
Factor
Space Maintainer
Monitor only
Indications
Early loss of primary molar; ≥6–12 months to eruption; high space-loss risk
Eruption imminent; minimal space-loss risk
Contraindications
Poor OH; uncooperative child
High crowding risk
Advantages
Maintains arch space
Avoids appliance complications
Disadvantages
Plaque accumulation; appliance breakage
Risk of space closure
Risks
Caries around band; soft tissue irritation
Malocclusion
POIG
Avoid sticky food; regular review
Monitor eruption
Monitor vs immediate restoration
Factor
Monitor
Immediate restoration
Indications
Non-cavitated lesion; good OH; low risk
Cavitated lesion; high risk
Advantage
Non-invasive
Stops progression immediately
Disadvantage
Risk of progression
More invasive
Risk
Lesion worsens
Restoration failure
POIG
Fluoride + review
Standard restoration advice
Clinical judgement pearl — a primary molar with caries extending >½ way through dentine but due to exfoliate within ~5 months is often better monitored than restored: caries won't progress that fast in the time remaining, and this avoids unnecessary treatment burden/cost for the family. Prioritise sealing/protecting permanent 6s in the same high-risk patient instead.
Master risk & POIG matrix
Procedure
Top risks
Core POIG
Typical review
Fissure Sealant/Protection
Loss/microleakage, occlusal high spot, transient sensitivity
No hot food/drink or lip-biting until sensation returns
—
SDF
Black staining, soft tissue staining
Avoid eating 30 min
6–12 months (reapply)
Longevity table (all materials)
Material/Tx
Duration
Fissure Protection (FP, GIC)
~6 months – 2 years
Fissure Sealant (FS, composite)
3–5 years
Fluoride varnish
3–6 months effect
SDF
~6–12 months
GIC restoration
2–5 years
RMGIC
3–6 years
Composite resin
5–10+ years
SSC
Until exfoliation
Temporary (IRM/Cavit)
Weeks–months
Competency & Common Errors Bank
Every "critical error / breach / competency feedback" pattern from clinical placement experience, de-identified and grouped by theme — presented as recurring failure modes to learn from, rather than as isolated incidents tied to one appointment.
Rubber dam & moisture control
Critical error Etching enamel for only 15s instead of the required 30s → restoration/sealant debonds with the clamp.
Critical error Removing the rubber dam before the CE has checked the restoration/sealant and occlusion — treated as a professionalism breach, not just a technical miss.
Critical error Polishing lower teeth without a gamer's clamp "because moisture control isn't needed" — it also protects the tongue; omission has caused tongue lacerations.
Punch the RD hole close to the midline, slightly toward the working side; bring a punch chart for reference if unsure of tooth-specific hole sizing.
Clamp must sit on the tooth, not the gingiva — clamping onto gum causes bleeding/soft tissue trauma and is a common reason competencies aren't signed off.
For a strong tongue thrust: still use a gamer's clamp + cotton rolls, stabilise with the non-dominant hand rather than removing it. Apply cocoa butter only once material has begun to set (too early wipes the material off).
If RD isolation genuinely can't be achieved (tooth anatomy, partial eruption), it's acceptable to change the treatment plan (e.g. FS → FP, or switch to cheek-guard/cotton-roll isolation) — document the reasoning.
Cavity prep & caries removal
Critical error Removing a marginal ridge / converting an O lesion into an unnecessary Class II — always confirm with the CE, BW, and clinical appearance whether the contact point is actually involved before deciding Class I vs II.
Always drill based on radiographic findings — a mesial prep that looks "caries-free" superficially may not have reached the actual lesion seen on the BW; some deep caries hides behind apparently sound enamel.
Interproximal caries usually sits at/below the contact point — extend further apically/below the contact rather than pushing deeper toward the pulp if you haven't found it yet.
Distinguish caries (inconsistent darker brown, sticky) from normal dentine (consistent dark yellow, smooth) after caries removal — don't over-prep chasing "dentine" that's actually sound.
Equigingival caries needs very good bur control angled toward the tooth to avoid cutting the interproximal gum; if bleeding starts, firm cotton-pellet pressure for 5 minutes usually achieves haemostasis (and it's more likely soft-tissue trauma than pulp exposure — check where the pulp actually is first).
Local anaesthesia
Critical error Choosing an IAN block for a Grade >3 mobile primary tooth — minimal buccal+lingual/palatal infiltration is all that's needed; requesting to sign off a competency for a technique that isn't indicated shows a knowledge gap, not just a skill gap.
Always confirm the bung is engaged before injecting (needle down, two quick smacks with the palm heel, then check).
Inject slowly — this is explicitly assessed, not just a comfort nicety.
Review exact anatomical insertion points before every block (palatal infiltration and IAN landmarks are commonly slightly mis-located).
LA should be purposeful, not routine — e.g. an occlusal Class I on a primary tooth may not need LA at all; don't anaesthetise "just in case."
Radiography
Critical error / breach Saving an X-ray into the wrong patient's file.
Retake rather than accept an elongated/overlapping film — check angulation, cone coverage, and holder choice before exposing.
OPG documentation order: purpose → normal findings → bone level → abnormal findings → recommendation.
Don't take multiple PAs "to be safe" when an OPG (not yet taken) would answer the question with less radiation — sequence your imaging requests logically.
Radiograph & ICDAS coding accuracy
Review ICDAS codes carefully — this was one of the most frequently repeated feedback themes (miscoding, missing interproximal shadows, confusing NCL/erosion cupping with caries).
Cross-reference the odontogram with previous charts and X-rays — this reliably catches missed crowns/fillings and previous restorations.
Don't miss soft-tissue pathology while focused on hard-tissue charting (e.g. an inflamed/bulbous gum margin suggesting abscess, orthodontic-appliance trauma lesions).
Documentation & professionalism
Treatment notes are a medico-legal document — they must reflect what was actually discussed/examined/planned, not just the procedure code.
Double-check tooth number and surface before confirming notes — wrong-tooth/wrong-surface entries risk wrong-tooth treatment later.
Write consent explanations in plain language the parent can understand.
Complete all item numbers and the problem list before sign-off, not just the clinical note text.
Match communication style to the patient's age — some medical-history questions that are routine for adults are not appropriate to ask a young child directly.
Follow up positive medical history findings with specific questions (triggers, frequency, severity, medication) rather than just recording the label (e.g. "epilepsy", "autism", "asthma").
Official BOH Competency Checklist
Distilled from the BOH Competency Based Clinical Assessment book (v7, 2026) — this is exactly what a Clinical Educator ticks Yes/No against when you request a sign-off. Repeated boilerplate criteria are factored out once below; each competency then lists only what's distinctive to that task. Grading is binary: Learner (needs assistance in ≥1 of infection control / technical ability / patient management / knowledge / professional attitude) vs Competent (independent in all five). You must pass every criterion — there's no partial credit — and a competency can never be attempted the very first time you're asked to perform that task.
Universal baseline (applies to almost every competency — assumed unless stated otherwise): correct infection control · checked medical history · appropriate explanation of treatment to patient/parent with written consent (incl. risks/complications) · correct instrument selection & safe handling/passing · appropriate finger rest, posture and use of mirror · soft tissue protection (no trauma) · professional, age-appropriate interaction with patient/parent · correct post-operative instructions given.
1–3. Infection Control · Ergonomics · Communication
Competency
Distinctive criteria
1.1 Clinical area set-up
Correct set-up/wipe-down per facility process; infection control maintained for the whole appointment, not just set-up (can be assessed while assisting another student).
2.1 Operator seating posture
Correct clock position for the specific tooth/task (feet, arms, head); correct use of indirect vision (mirror); correct chair, patient, bracket table and light position. Only assessable during periodontal/restorative treatment (not exams).
3.1 Patient communication
Explains alternate treatment options; explains risks/complications of all options; active listening; gives the patient a chance to ask questions; appropriate cultural considerations; written consent obtained before treatment starts.
3.2 Team communication
Respectful/professional with peers and LHD staff (reception, assistants, clinic lead) — must interact with both categories or the competency cannot be gained at all; shows cooperation and helps tasks that benefit the whole team.
4. Prevention
Competency
Distinctive criteria
4.1 Prophylaxis
Recognises intrinsic vs extrinsic staining; correct rationale + agent/powder selection; correct speed (~7000 RPM) / tip angulation (30–50°); no more than ~0.5mm subgingival with the cup; trauma-free.
4.2 Rubber dam placement
Placed within 5 minutes (excl. set-up); correct clamp selection; if winged, dam placed over the wings; correct ligature, frame, interproximal adaptation; no major tears; no obstruction of nose/eyes; correct isolation achieved.
4.3 Fissure sealant (resin)
≥2 molars in one appointment, one maxillary + one mandibular, both competent; correct etch technique; checked marginal seal + occlusion; correct light/etchant safety precautions.
4.4 Fissure protection (GIC)
Same structure as 4.3 (≥2 molars, one max + one mand) but with GIC material reasoning instead of resin.
4.5 Fluoride varnish
Dispensed per LHD process and current ADA fluoride guidelines; correct patient positioning; appropriate amount dispensed and applied; suitable surfaces only.
5. Examination & Treatment Planning
Competency
Distinctive criteria
5.1 Perio charting & diagnosis
Initial assessment (not a review); ≥20 teeth present to be eligible; pockets/furcation/mobility/recession/BOP/suppuration/CAL all correct with <3 minor errors permitted, and zero errors that could change the staging classification; reviews OPGs (~5yr apart)/BW/PA for bone levels; correct 2017 AAP diagnosis; full chart + diagnosis in one appointment.
5.2 Periodontal TP (adult)
Based on LA needs — never plan upper-arch-then-lower-arch if it needs two blocks (contraindicated); sequence half-mouth or quadrant-by-quadrant with LA, then 6-week review, then 3-month review after the final fine-scale appointment.
5.3 Comprehensive exam + TP (child)
Patient must have ≥3 carious lesions at varying stages (enamel→dentine, active or inactive); caries risk, diet, home-care, saliva, periodontal status all checked; correct occlusion identified; preventive/periodontal/restorative plan formulated with correct sequencing and referral pathway; correct item numbers + odontogram + referrals completed.
5.4 Comprehensive exam (adult)
Patient must have caries present; PSR/SBI/API checked; caries risk, diet, saliva, smoking status all checked; correct occlusion; accurate charting.
5.5 Treatment plan (adult)
Can combine with 5.4; all histories (medical/social/familial/pain) + periodontal/caries-risk/diet/saliva/smoking analysed; sound diagnosis and treatment plan formulated; correct Titanium entries.
6. Local Anaesthetic
Shared across all 4 LA competencies (buccal infiltration, IAN+lingual block, palatal infiltration, long buccal block): correct anaesthetic selection + max dose knowledge; correct anatomical landmarks for this specific patient; correct armamentarium assembly; anatomical puncture point identified; correct needle orientation to landmarks; correct depth/syringe orientation; correct dose administered; profound anaesthesia achieved; no soft tissue trauma; correct recapping/dismantling/sharps disposal. IAN block additionally requires appropriate aspiration to be demonstrated.
7. Restorations
Competency
Distinctive criteria
7.1 Class I composite (permanent)
Caries must extend past the DEJ in a pit/fissure (occlusal/buccal/palatal); pulp exposure from caries (not operator error) doesn't fail the competency; correct cavity design + occlusal contact restoration.
7.2 Class II composite (permanent)
Caries past DEJ; must have an adjacent tooth requiring a matrix (can't be done with no neighbour); correct matrix band adaptation; no iatrogenic damage to the adjacent tooth; correct occlusal + proximal contacts.
7.3 Class III/IV composite (permanent)
Restricted to teeth 13–23 or 33–43; correct celluloid strip placement where applicable; correct incisal edge contour; occlusion checked/adjusted.
7.4 Class V composite/GIC or root caries
Composite or GIC allowed; moisture control required (retraction cord not always needed); can be active or arrested root caries needing restoration; must involve actual cavity prep with handpiece/hand instruments — no-prep = a sealant (item 161), not this competency; cannot be a pit/fissure lesion (that's Class I).
7.5 Class II GIC (primary tooth)
Primary tooth, caries past DEJ, needs an adjacent tooth requiring a matrix; no iatrogenic damage to adjacent tooth; correct final GIC coat applied.
7.6 Pulpotomy (primary)
No signs/symptoms of irreversible pulpitis; must be restored with an SSC same or subsequent appointment; correct access/timing of opening pulp chamber; adequate cleansing/assessment of chamber; correct pulpal medicament + IRM/core; if SSC placed same visit, correct prep with no damage to adjacent teeth. Can be completed in Sim Lab or clinic.
7.7 Stainless steel crown
Hall or conventional technique, on a D or E; airway protection is an explicit separate criterion; correct occlusal/proximal reduction (conventional only); correct luting cement + SSC size + adaptation + cementation; excess cement removed.
8. Periodontal Treatment
Competency
Distinctive criteria
8.1 Supra-gingival debridement (1 sextant)
≥6 teeth with supragingival calculus extending to just under the middle third of the crown; triplex to rinse/dry + explorer for detection; systematic approach rolling around line angles; correctly identifies completed areas vs remaining deposits.
≥4 teeth with PD ≥5mm; significant subgingival calculus confirmed by exploration and/or radiograph.
8.3 Instrument sharpening
Hu-Friedy "it's about time" technique with correct terminal shank/stone position except at SDH/Westmead, where the Gleason Guide is used instead (LHD preference); correct grasp of instrument + stone; non-dominant elbow supported; fluid motion; finish on a downward stroke; clear shavings; correct test-stick use.
9. Extraction
9.1 Extraction of primary tooth: no greater than Grade 1 mobility; anterior or posterior; correct forceps grip and extraction technique; appropriate apical drive established; complete tooth removal; airway protection is a distinct explicit criterion; haemorrhage management assessed.
10. Radiographs
Competency
Distinctive criteria
10.1 Bitewing (×2)
Must be a set of two, both meeting criteria; no cone-cutting; correct holder assembly + film size + tube angulation; correct film disinfection.
10.2 Periapical
Same radiographic-quality criteria as BW, single film.
10.3 OPG
Items/artefacts checked and removed before placing patient in the machine; correct patient placement in the machine itself (not just bite block); absence of artefacts on the developed image.
All three radiograph competencies also require complete diagnosis and interpretation of the radiographic findings as a pass/fail criterion — taking a technically perfect film isn't enough without the write-up.
Practical takeaways for placement planning: BOH2 hurdle = any 6 competencies signed off as competent; BOH3 hurdle = all competencies signed off, and BOH2 attempts roll over. Aiming for 1–2 sign-offs per week in BOH3 helps finish by end of semester 2. Requesting a competency attempt at the start of the session, written into the appointment plan, is standard practice — the CE must agree the patient is suitable first.
Cheat Sheet / Quick Numbers
Duraphat max dose
<6y
0.25mL
6–12y
0.40mL
Adolescent/adult
0.75mL
Toothpaste fluoride by age
<6y
500–1000ppm
6–16y
1000–1450ppm
≥16y high risk
2800–5000ppm
One-line memory tricks
"Fluoride = months, Fillings = years, Crowns = longest."
"Blue = breathe now (reliever); Red/Brown = reduce inflammation (preventer)."
FP(GIC) = early caries OR poor isolation; FS(composite) = sound fissure + good isolation.
221 (full periodontal exam) only chargeable after a complete perio chart (pockets + mobility + furcation + suppuration + bleeding).
222 (subgingival instrumentation) only for pockets ≥4mm, per tooth.
Don't charge an OPG-reporting item (e.g. 037) if you didn't take the OPG yourself.
Diagrams
Key reference diagrams (eruption charts, perio stage/grade, tonsil grading, LA landmarks, trauma classification, MIH, common soft-tissue variants) are embedded directly in the relevant sections above (see assets/). A few remaining image-heavy topics (ICDAS clinical photos, occlusion photos, step-by-step clinical photos for pulpotomy/SSC/CR) are captured here as reasoning, numbers and tables rather than as photos.
Case Simulator
De-identified clinical scenarios drawn from real placement experience. Each one poses a genuine diagnostic or management decision — read the scenario and prompt, work through your own differentials/reasoning first, then reveal the reasoning actually used to compare.